
If You Don't Make Your Content Accessible, You're Leaving Me Out
Summary: Captions (for video) or a transcript (for audio) should be included with all multimedia content produced by Austin ISD staff, including instructor- and student-created content. These alternate formats improve the playback experience for audiences in a variety of contexts and situations.
Terminology

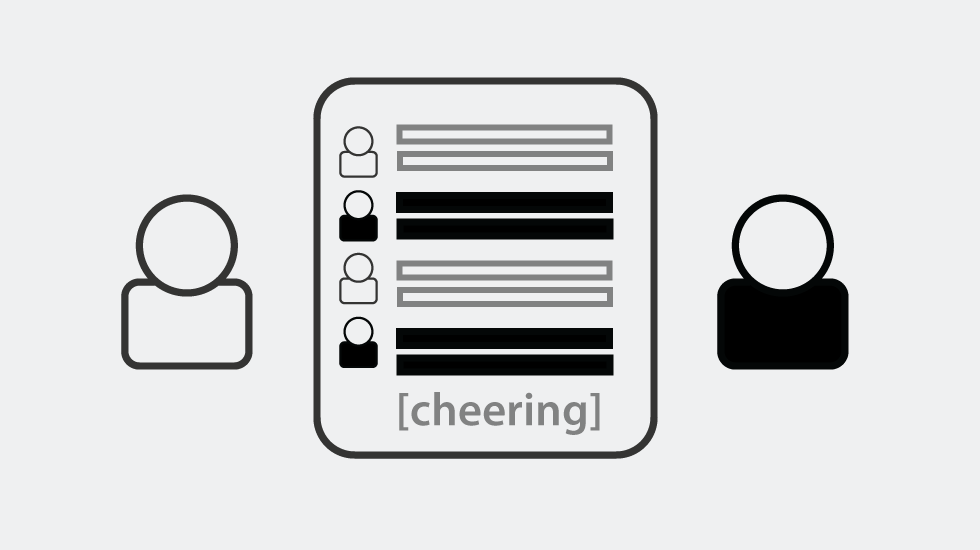
Captions:
- display all audio information including sound effects or music.
- identify speakers.
- are displayed in the same language as the audio.
- can be either “closed” (able to be turned on or off by the user) or “open” (on all the time).
- include timing data to be displayed at the appropriate time of audio and video.
Video Example: Captions
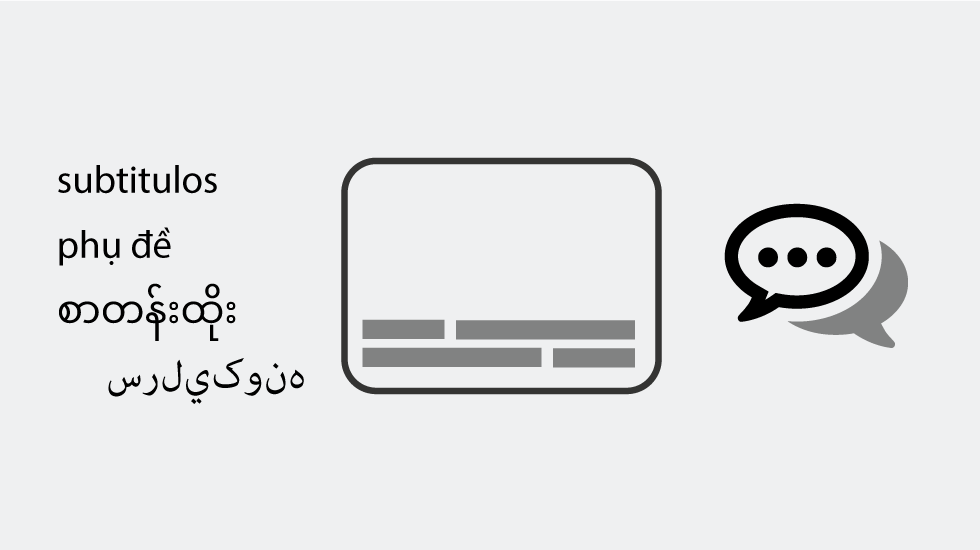
Subtitles:
- display only spoken content.
- are often (but not always) in a language other than the language of the audio.
- can be turned on or off by the user.
Article: Subtitles Explained
Transcripts:
-
Transcripts are text versions of the video that indicate who is speaking and include other sounds that occur.
-
"Audio only" files require a transcript that is traditionally published on the same page or as a downloadable text file.
Video Example: Transcripts
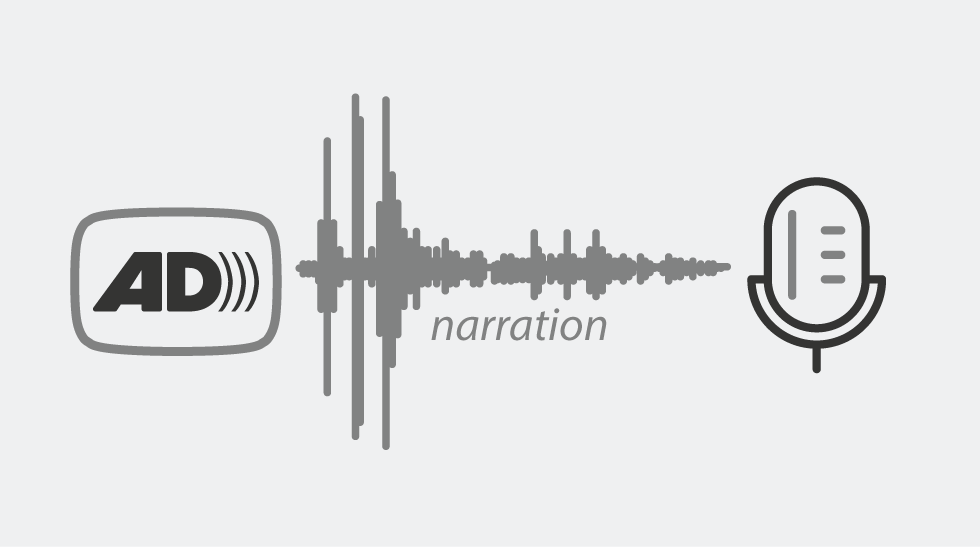
Audio Descriptions:
- An audio description is a verbal description of essential visual information necessary to understand the story and purpose of the video.
- The narrator describes important visual elements as they occur.
Video Example: Audio Descriptions
Who does the captioning?
You can do the captioning yourself or contact one of the captioning vendors listed on this page.
Third party vendors usually charge by the length of video. Charges depend on services rendered and range from $1.00–$1.30 or so per minute. Some providers have a 12-hour to same week-turn around time. If your video is longer than five- to ten-minutes, we recommend using a captioning service.
Service providers and resources:
Who benefits from captioning and/or transcripts?
Captions are necessary for accessibility and usability as they provide access to a wider audience including users:
- learning another language or those whose native language is not that of the audio content (i.e. multilingual students and parents).
- with learning disabilities or other cognitive impairments to help them make it easier to understand content when reading along while listening.
- who learn by taking in information in multiple ways.
- in quiet environments where audio output is undesirable (i.e. libraries).
- in noisy environments where audio may be difficult to hear or understand (i.e. public places, or forgot earbuds ad home).
- who are looking for information contained in the transcript. Search engines can find info in transcripts, but not in a video or audio file.
-
who are blind or with low vision who use video transcripts that are read by screen readers or turned into Braille documents.
YouTube is in transition
It's worth noting that YouTube has been updating features in stages. Some of the written & video documentation is out of date. What you may experience using YouTube Studio tools may differ from them. The following instructions are based on the software features as of June 2020 as they move away from You Tube Classic.
3 Ways To Caption Your Videos!
YouTube is the Austin ISD's preferred, supported video host (though you can also add captions to videos located on your Google Drive, Vimeo, Facebook, Twitter). YouTube supports three methods of creating captions by 1) transcribe & auto-sync, 2) uploading a file and 3) automatic captioning.
Rikki Poynter is a content creator, activist, and public speaker
How to upload a video on YouTube
This tutorial assumes you’ll be hosting your video on YouTube. There are often many options to navigate to the same place by using icons, text links, and dropdown menus within YouTube. Most access point for tools are designed to be intuitive. This tutorial only explores the desktop browser version and not the mobile application.
'How to' with screen shots
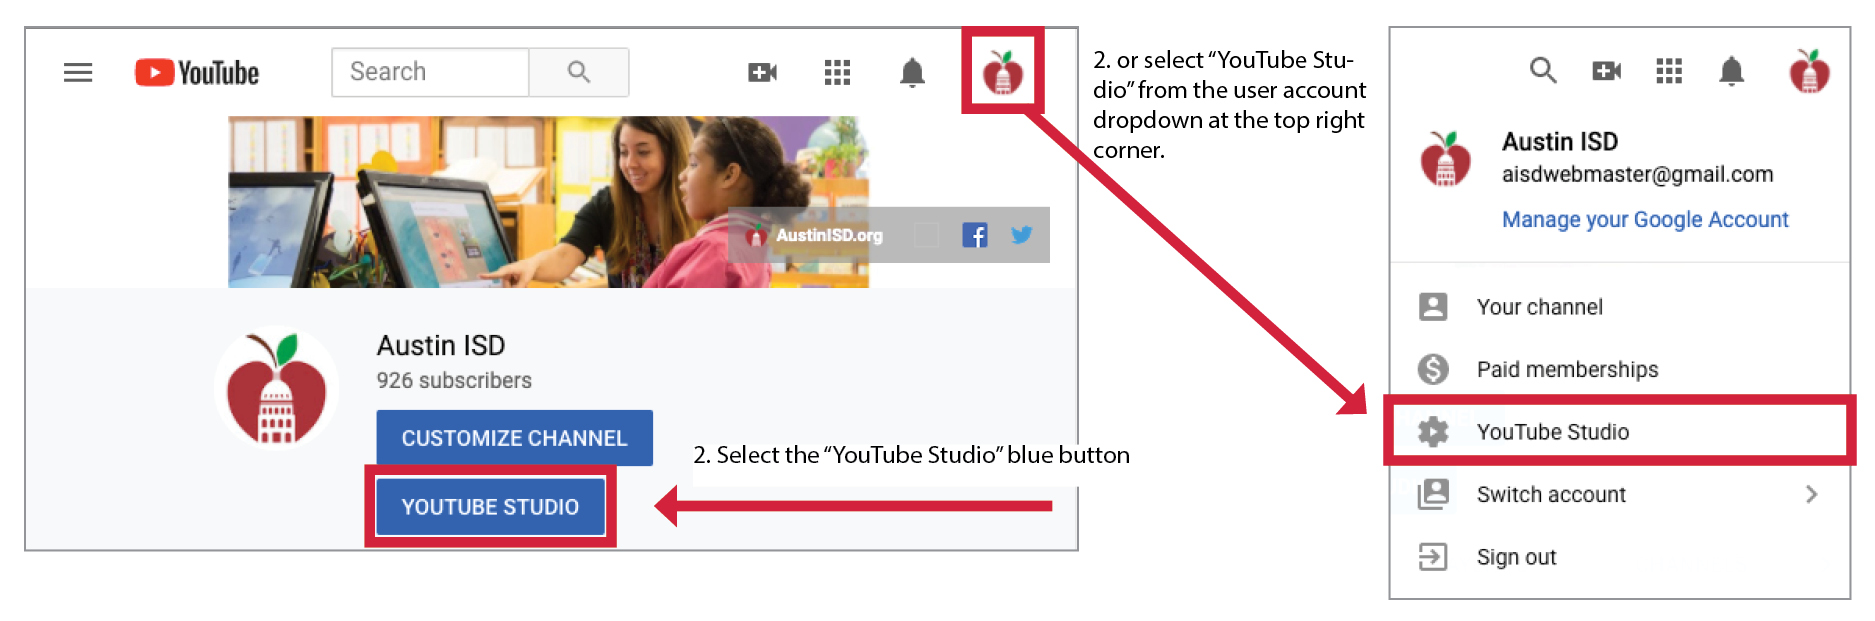
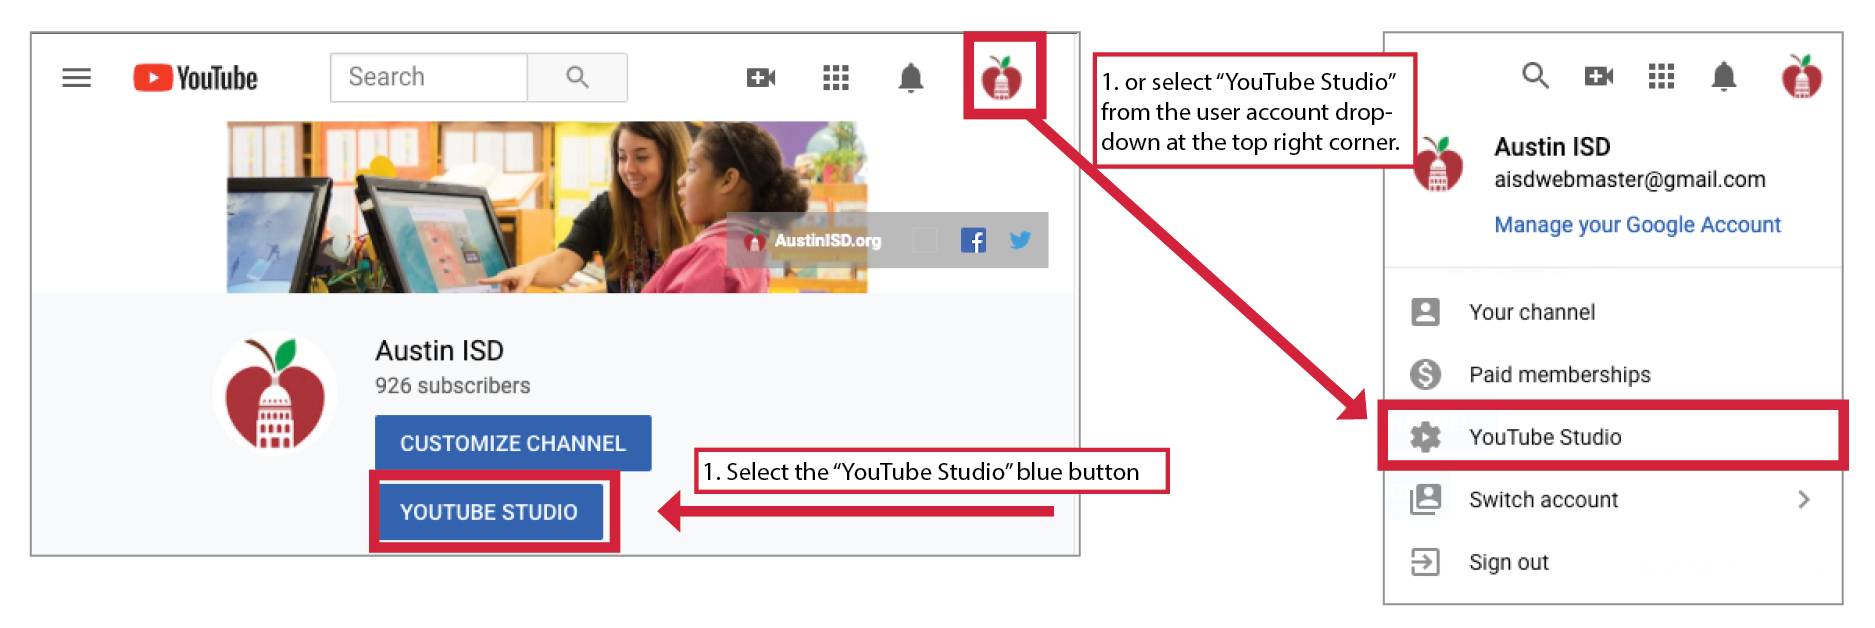
- While logged into YouTube at the top right from the user account icon select YouTube Studio from the dropdown menu , or select the large blue YOUTUBE STUDIO button.

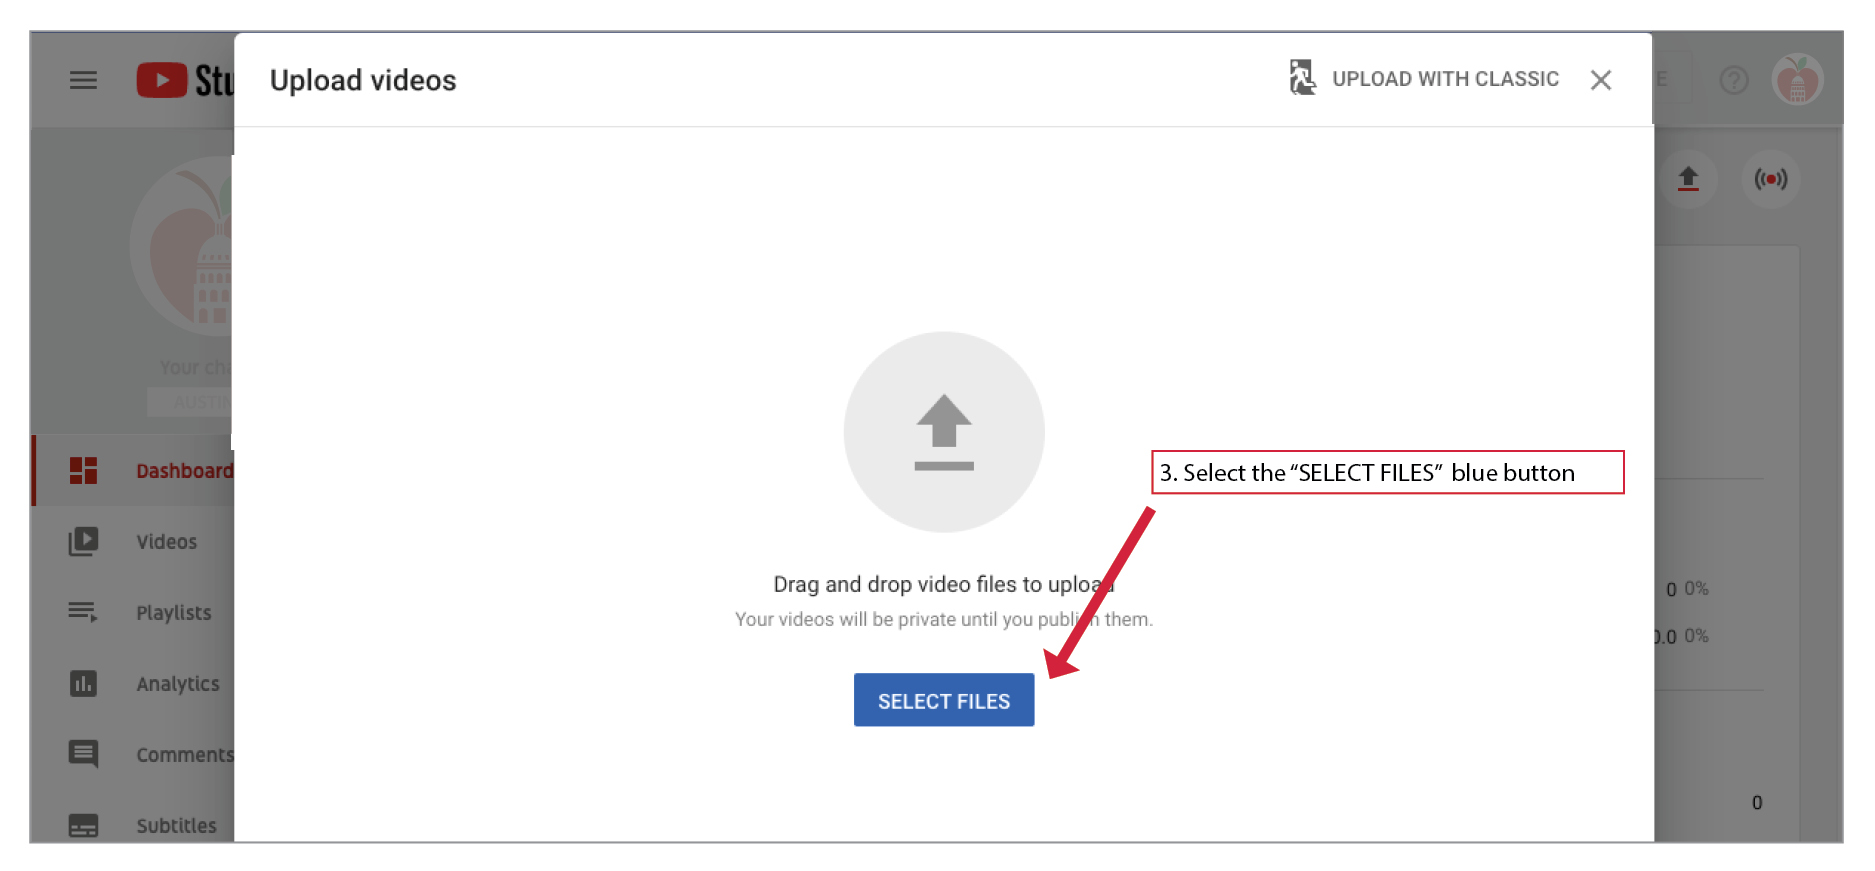
- If you are on the Channel Dashboard select the Upload icon at the top right, or you can click the Create icon and select the Upload Video from the dropdown menu, and one more option is to select the UPLOAD VIDEOS large blue button
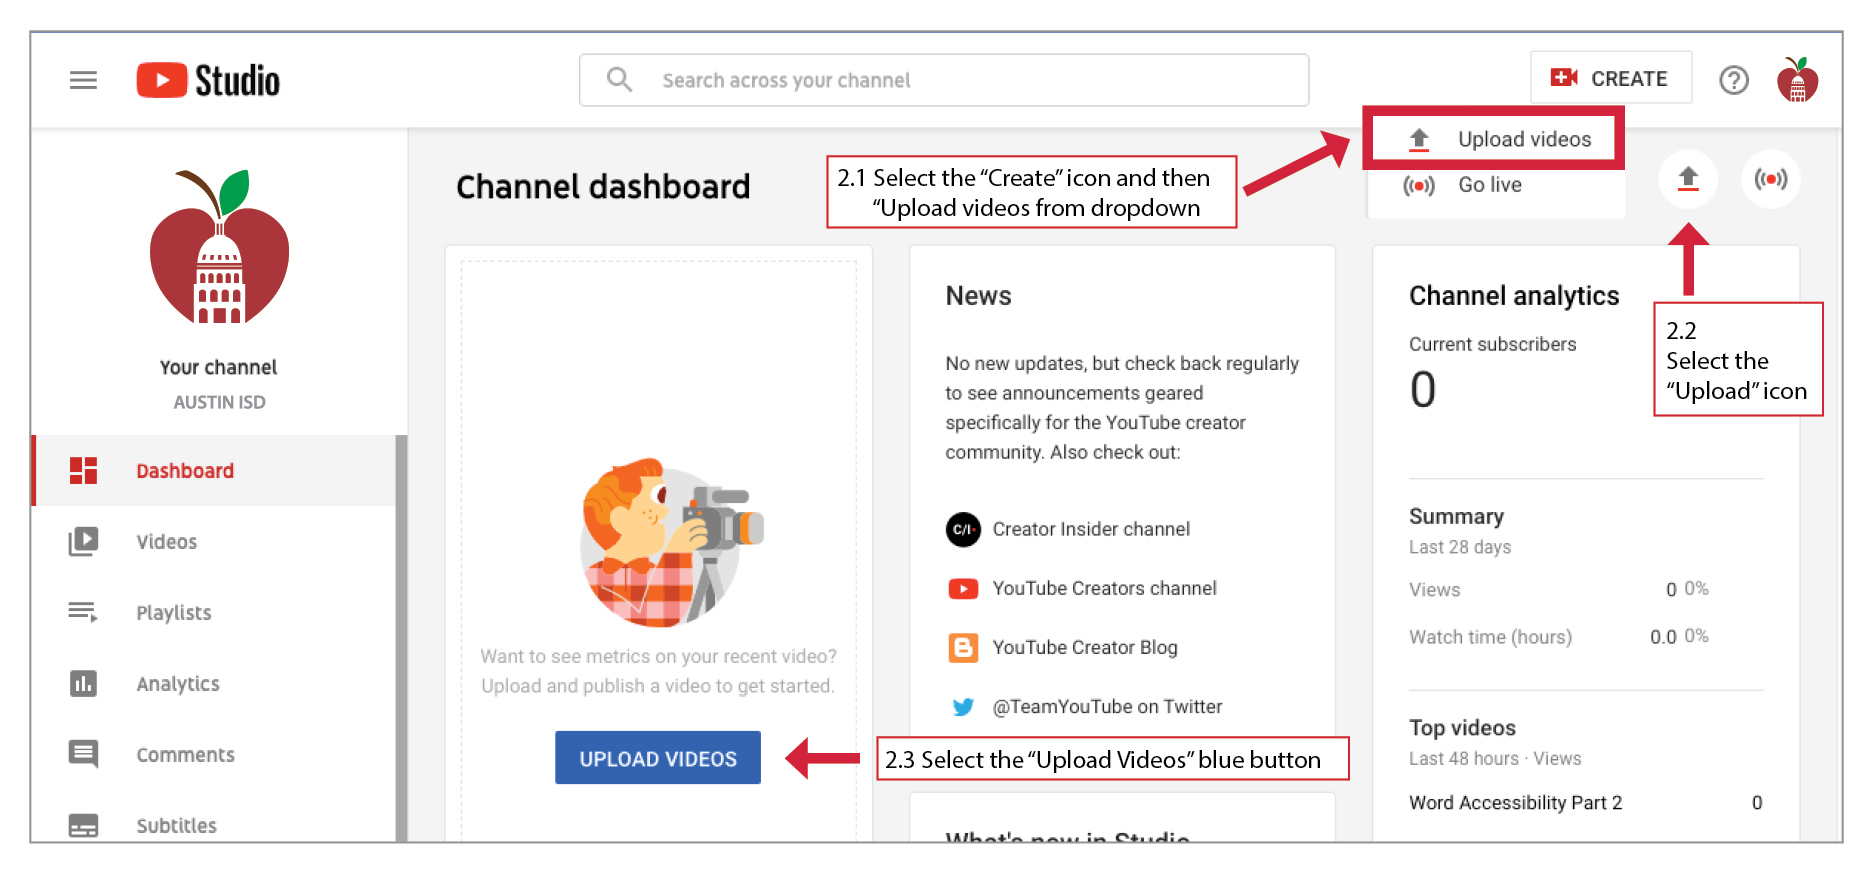
- A popup window appears, click and drag files, or click on the Select Files button to navigate to the video file(s) on your computer. After selecting a file to upload you can close the upload screen at any point it it will be saved to as a Draft on your Videos page
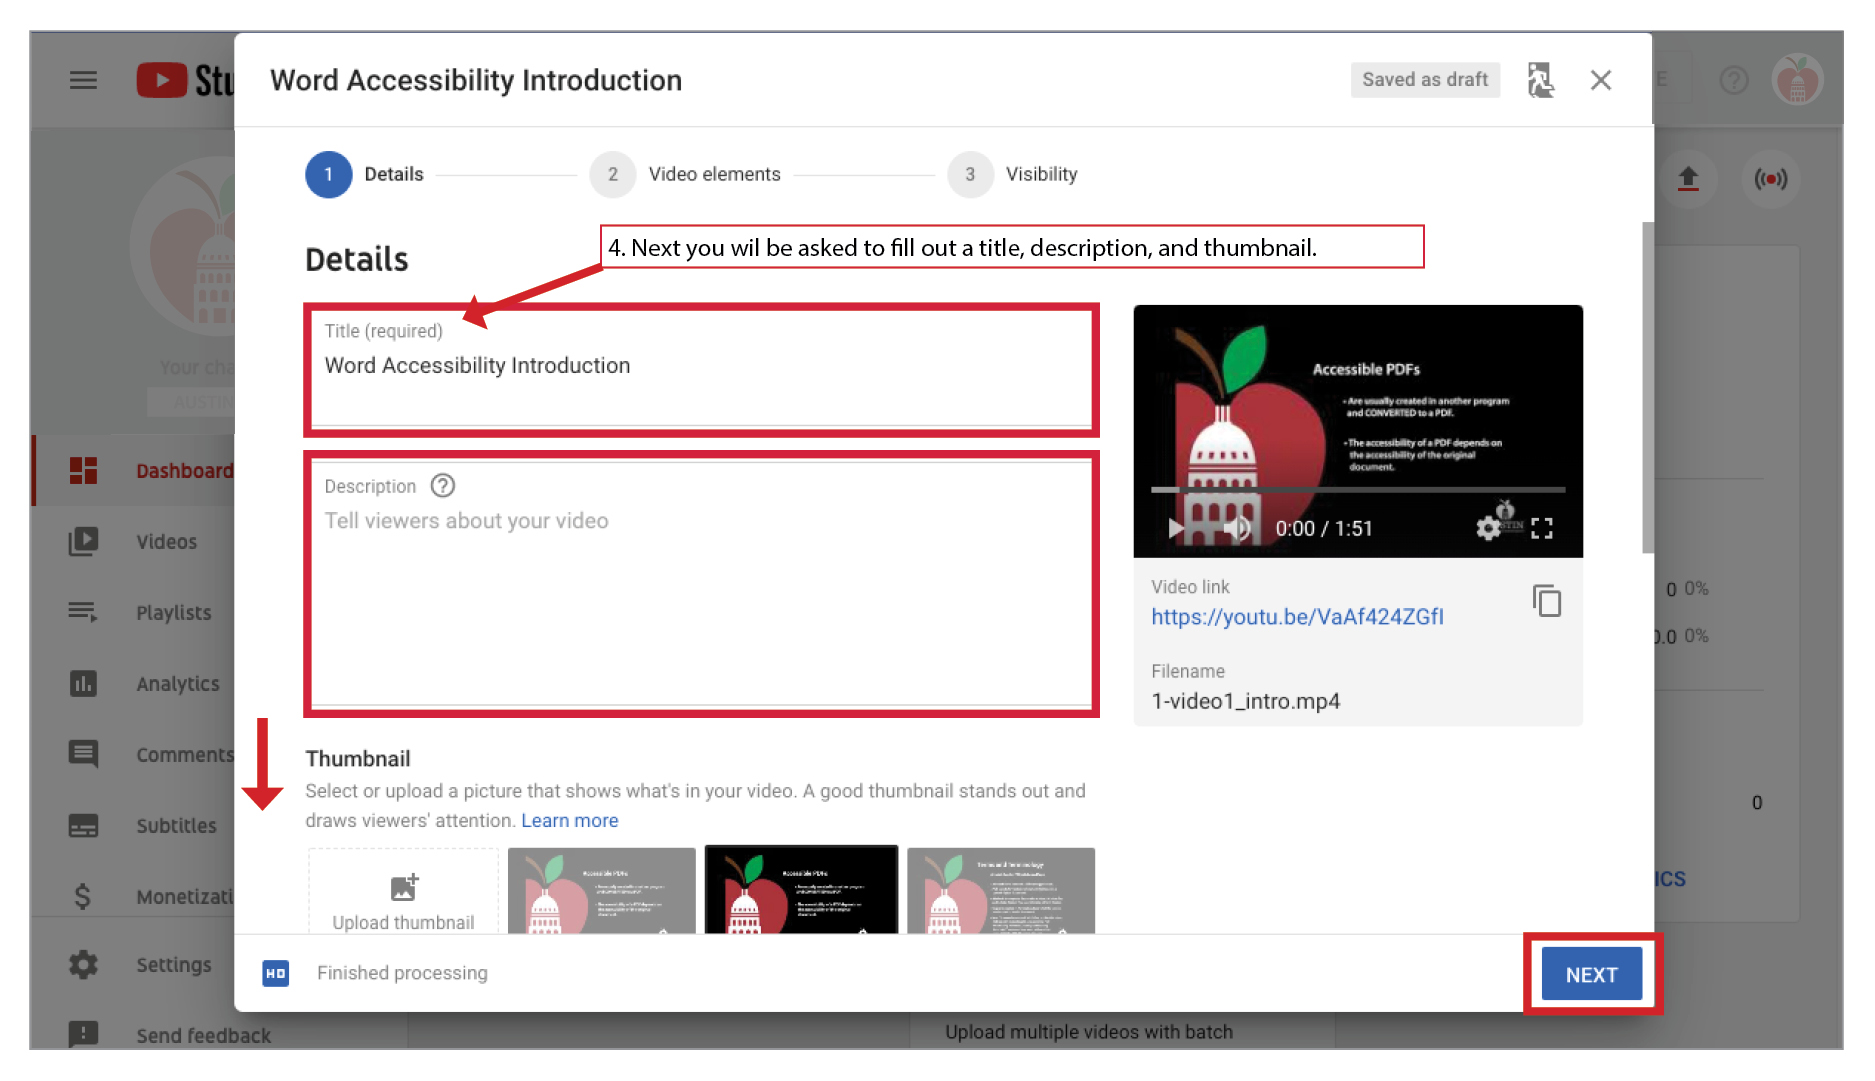
- Next in the Details section you will be asked to fill out a title, description, and thumbnail. At this time you can also add it to a playlist. You will be asked to set the video’s audience.
Additional settings are under More Options tab that are helpful options for SEO, accessibility, and video management; record sate; video location; original video language, subtitles, and CC (required for accessibility); manage comments; embedding options.
Once you have added these details click the NEXT button at the bottom right.
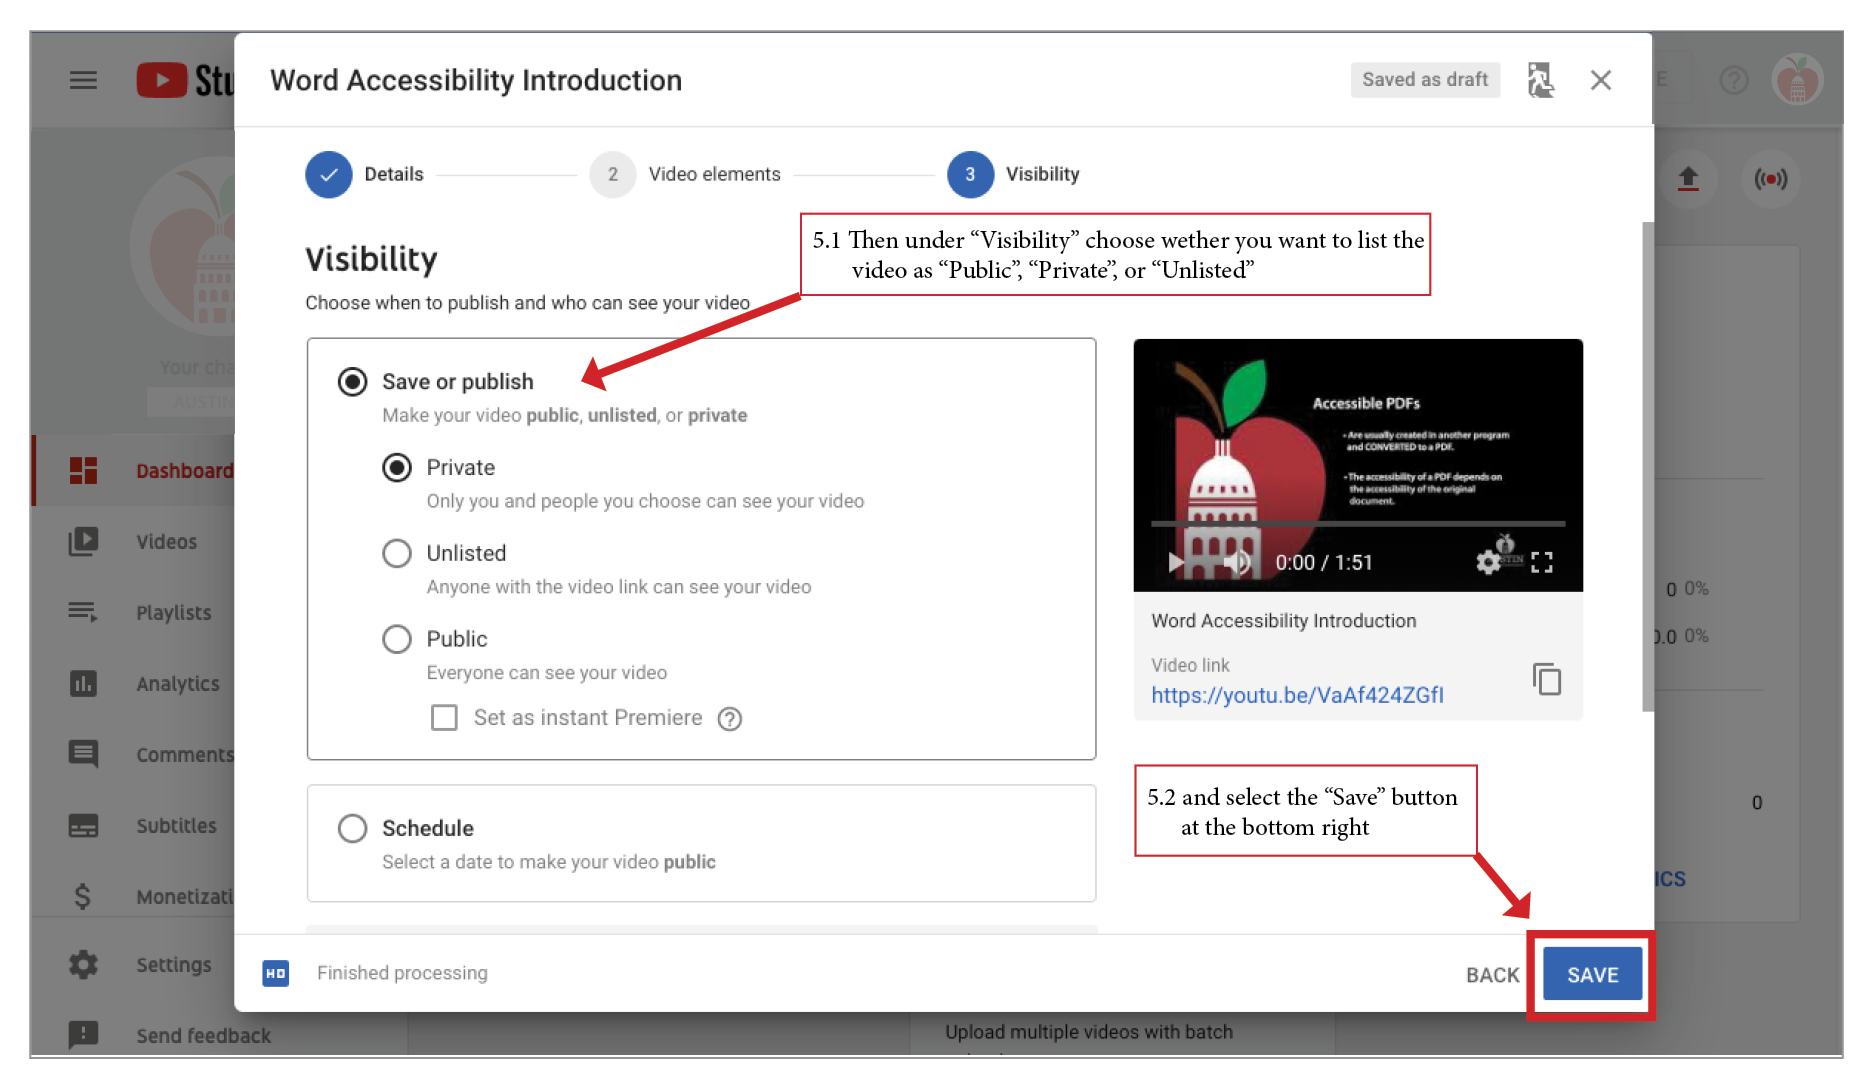
You will be asked about Monetization (Ad Settings) and Video Elements (not required) and select NEXT button at the bottom right.
- Then under Visibility choose whether you want to list the video as “Public”, “Private”, or “Unlisted” and select the SAVE button at the bottom right.
Video Example: How to Upload a Video
Method 1: How to add captions to YouTube video using Transcribe & auto-sync (original language of video only)
You may have noticed that YouTube creates captions for you. This feature is called Transcribe & auto-sync, and it provides a good start if you don't have a transcript file. But you will always have to correct auto-synched captions. This tutorial shows you how to correct the captions that YouTube creates automatically.
Article: 3PlayMedia (2020) Are automatic captions WCAG, ADA, or 508 compliant?
This tutorial assumes you’ll be hosting your video on YouTube and that you have already uploaded a video.
'How to' with screen shots
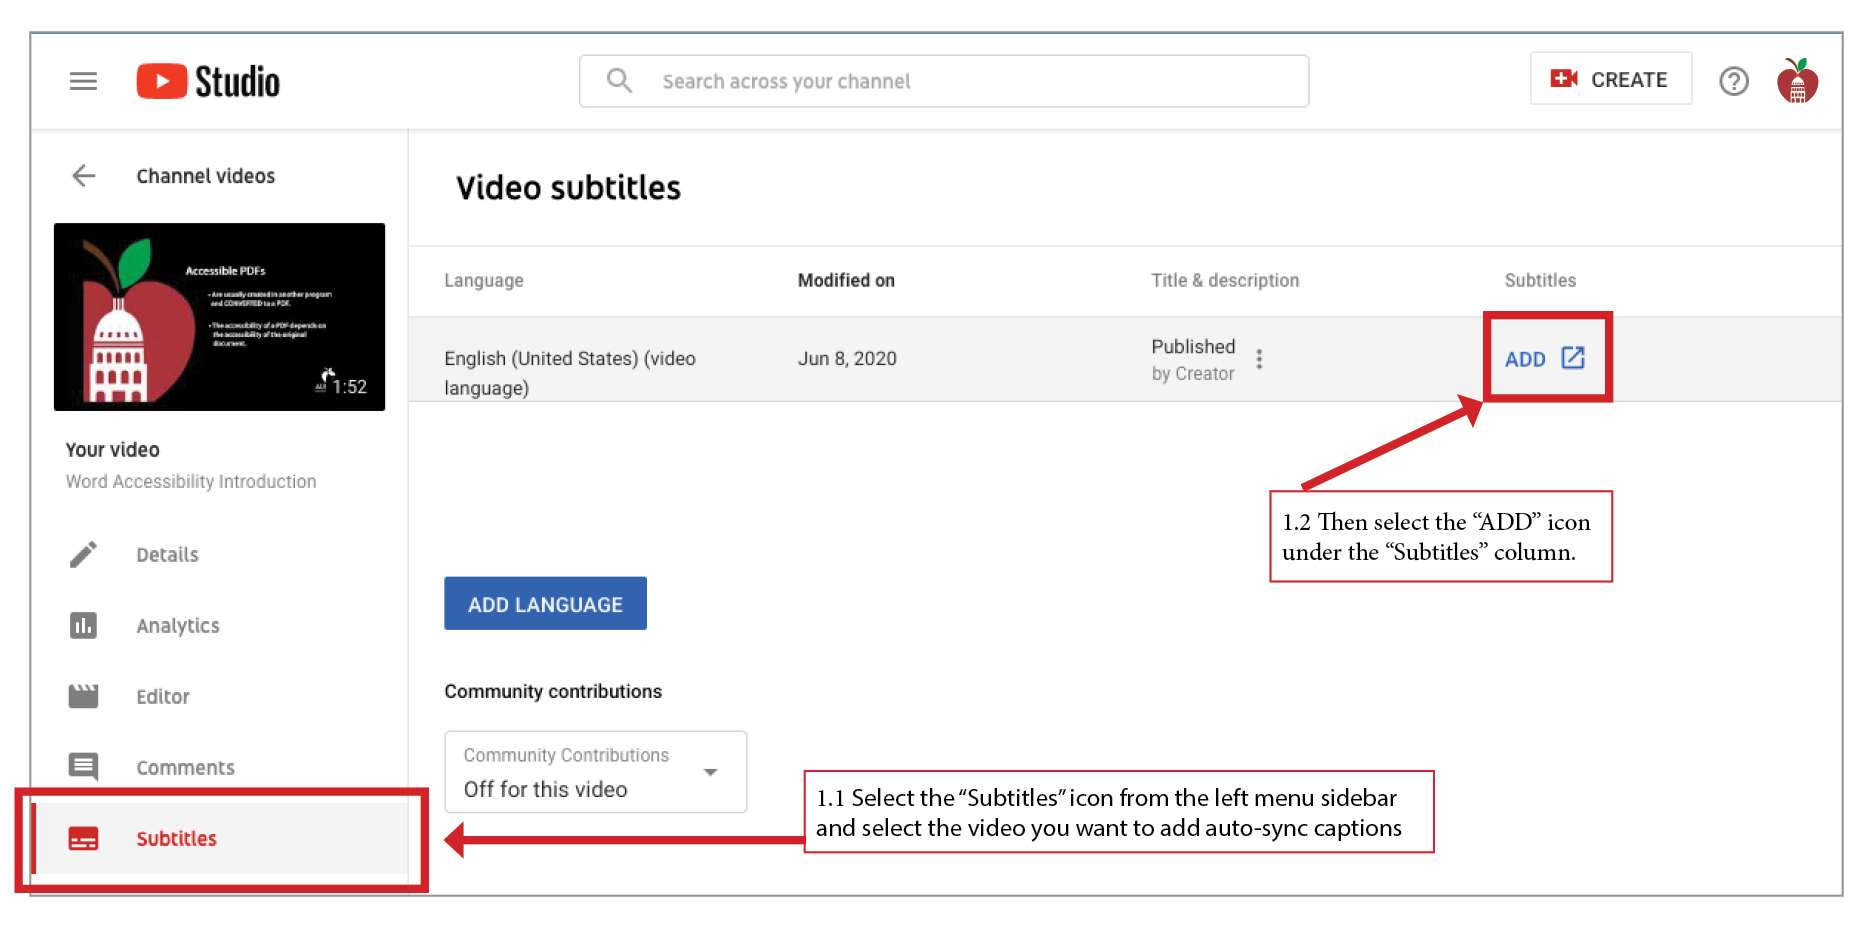
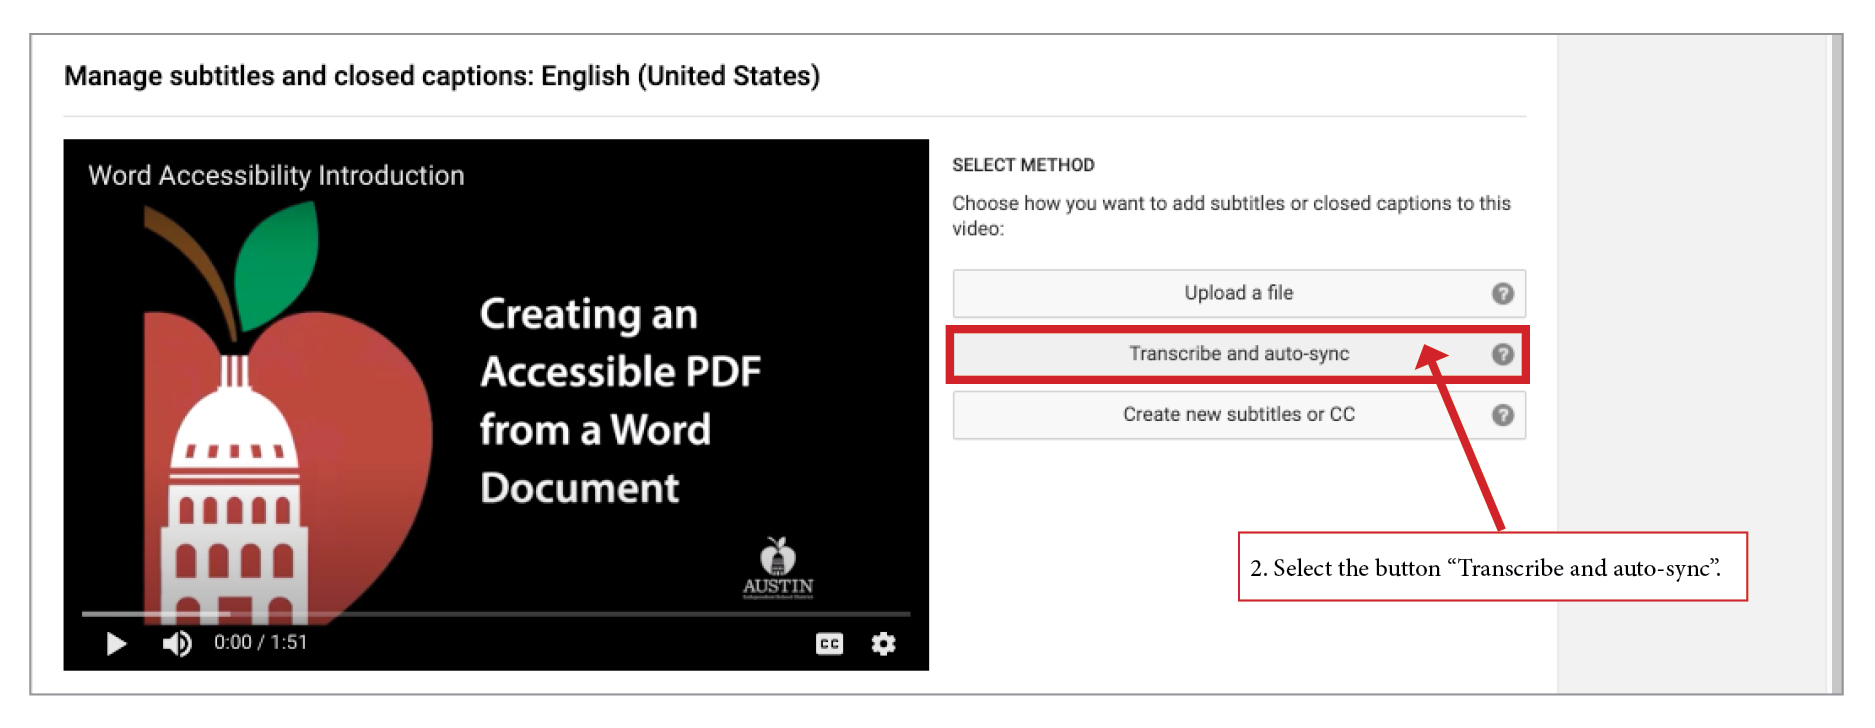
- In YouTube Studio select the Subtitles”icon from the left menu sidebar and select the video you want to add auto-sync captions. Then select the ADD icon under the “Subtitles” column.
- On the "Managing subtitles and closed captions" screen select the button Transcribe and auto-sync button.
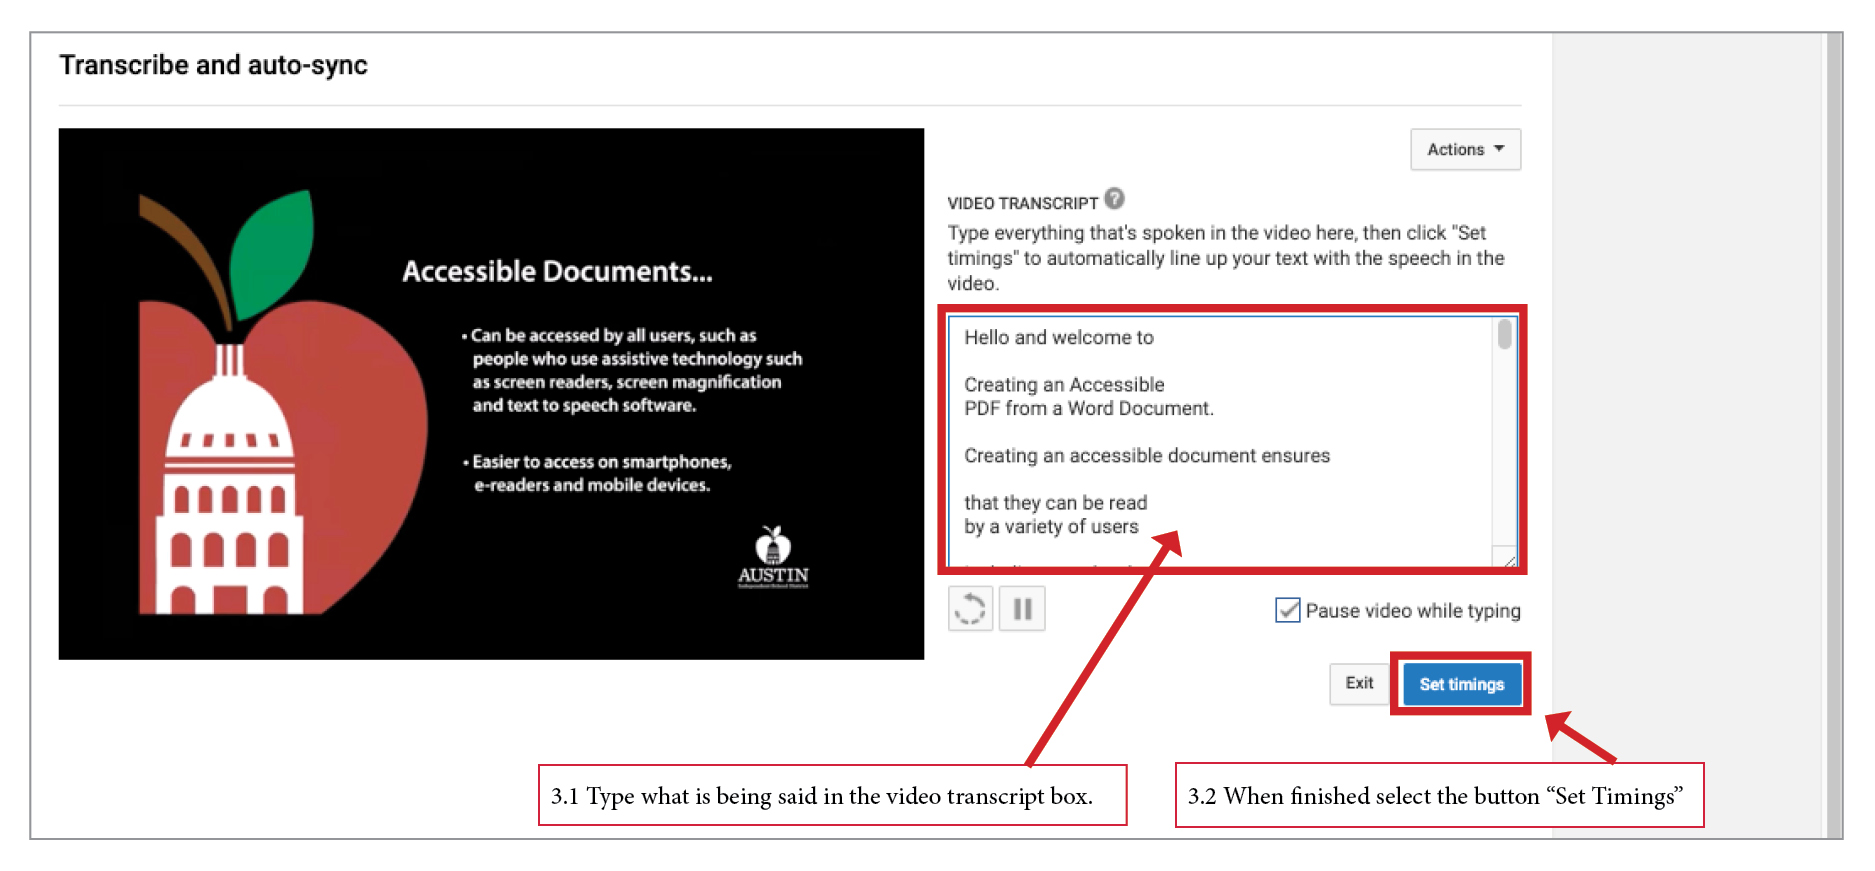
- Play the video and type what is being said in the video transcript box. When finished select the button Set Timings. Setting timings may take some time depending on the length of your video.
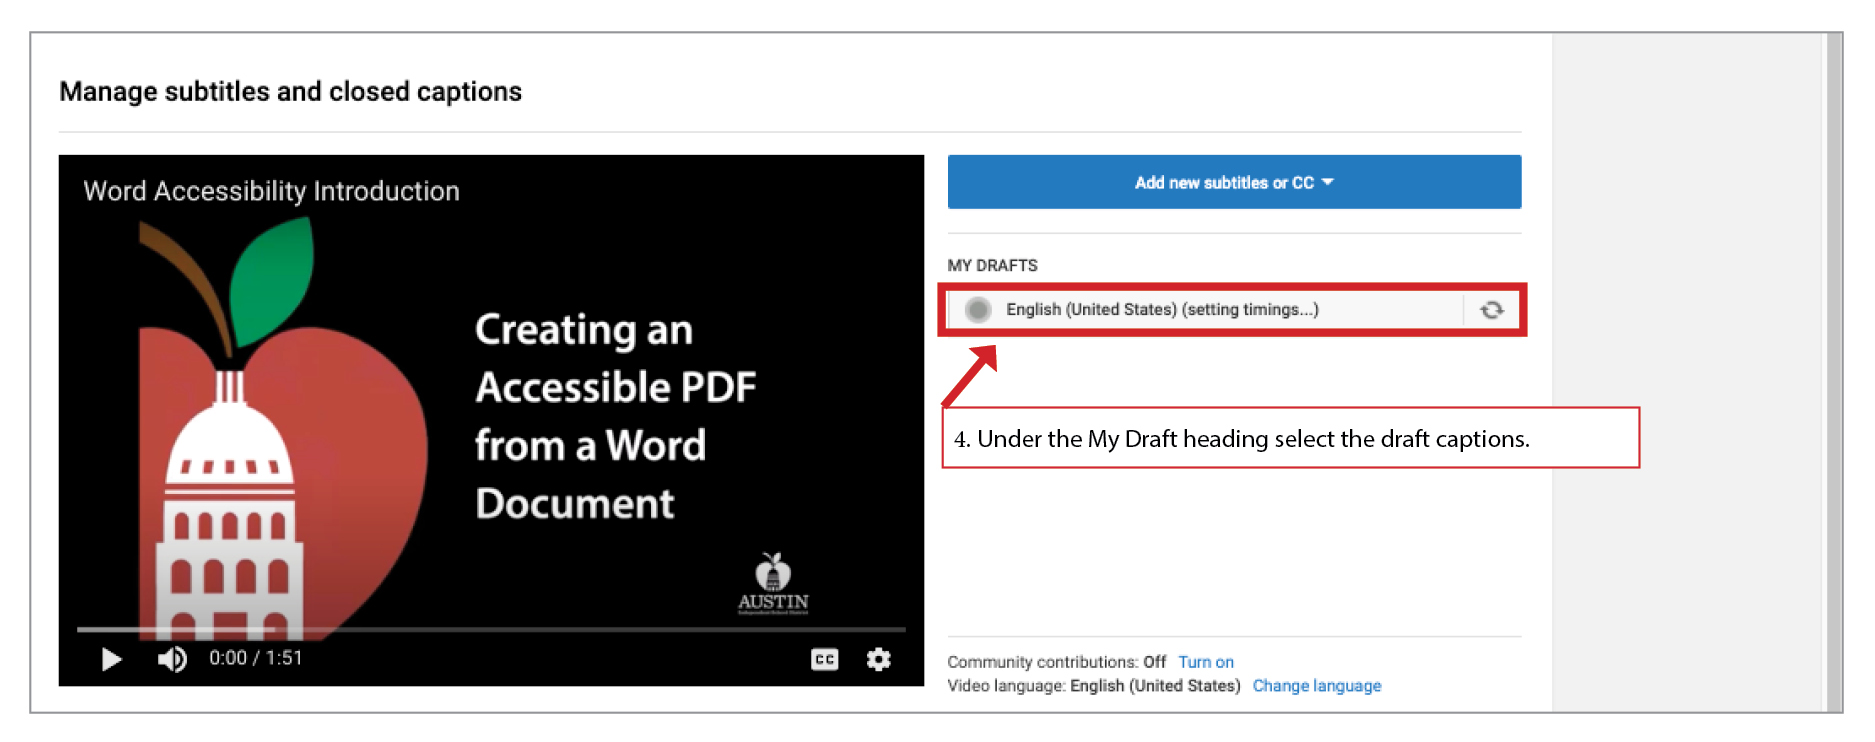
- Under the My Draft heading select the draft captions.
-
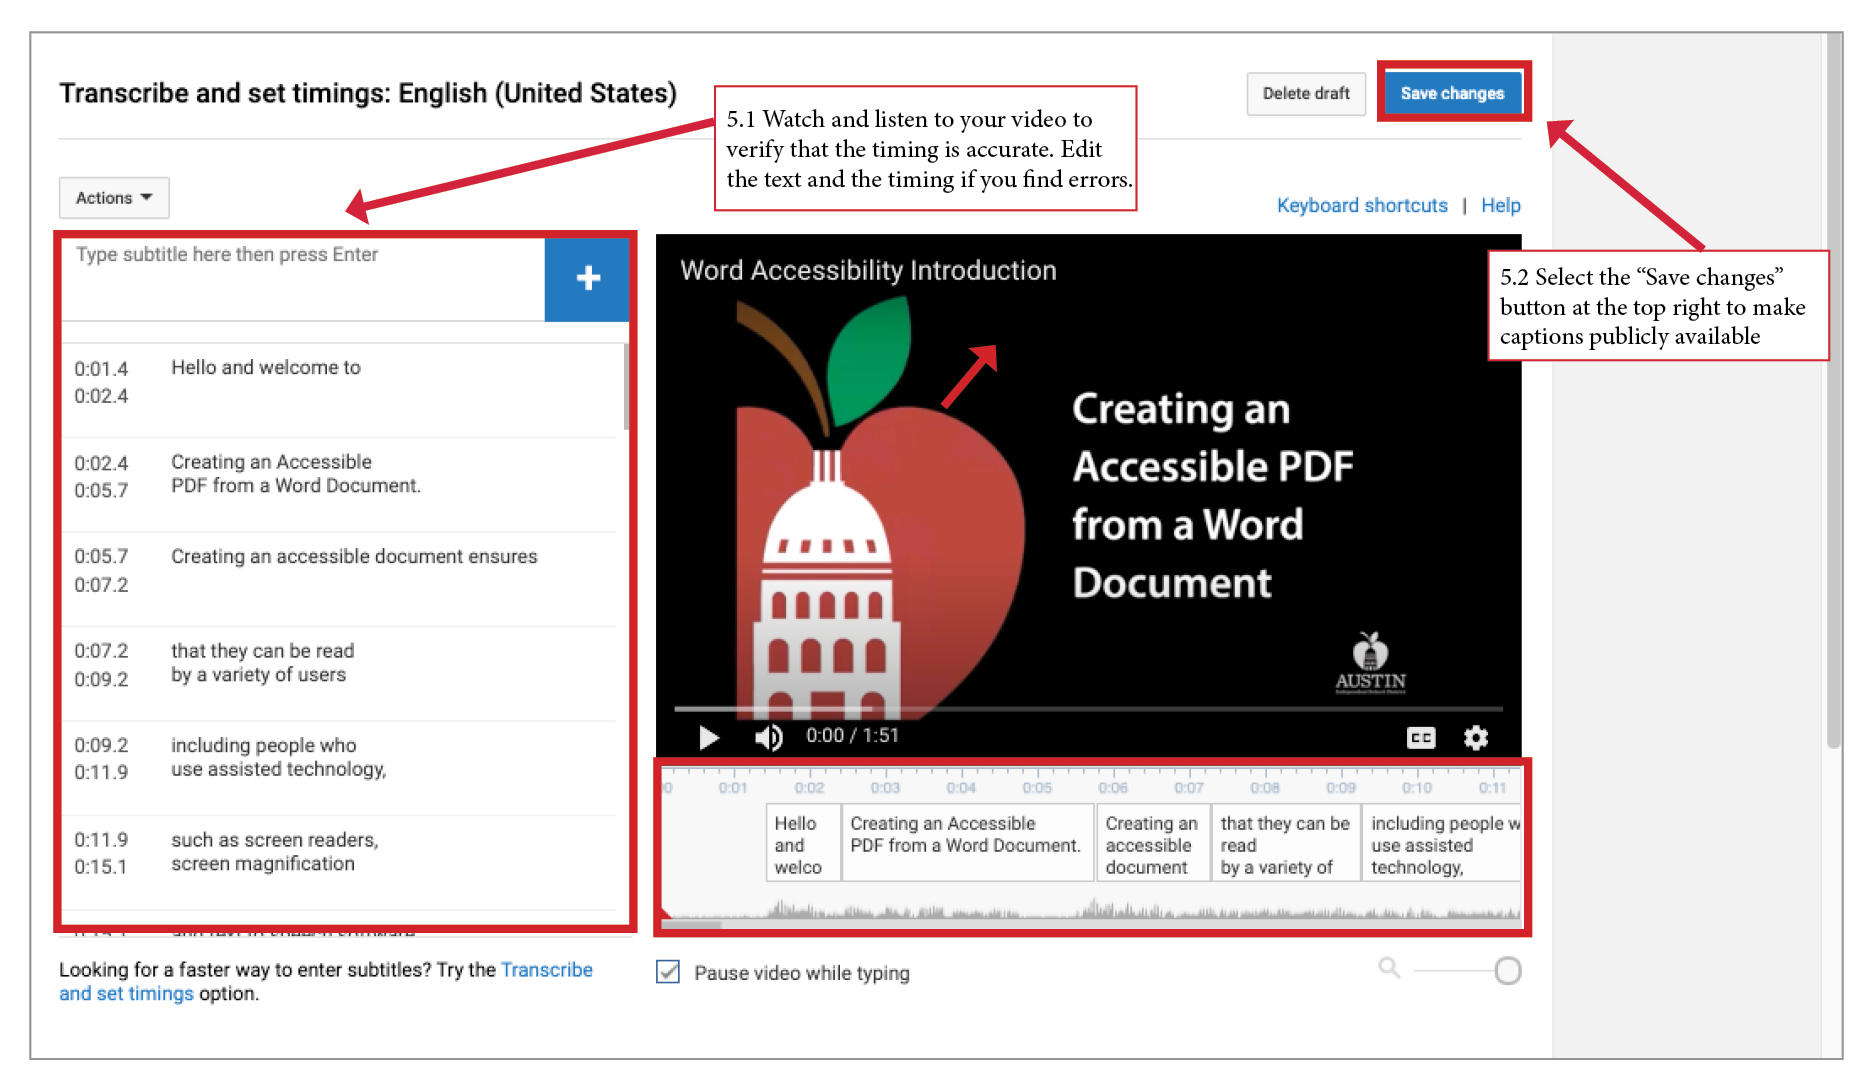
Watch and listen to your video to verify that the timing is accurate. Edit the text and the timing if you find errors by typing into the captioning fields section, using the plus icon, and scrolling over the video player timing section. Select the Save changes button at the top right to make captions publicly available.
Video Example: How to Upload a Video
Video Example: Navigating YouTube Studio
Video Example: Automatic timing in captions
YouTube Documentation: Add your own subtitles & closed captions
Method 2: How to add captions to You Tube when you have a transcript
This tutorial assumes you’ll be hosting your video on YouTube and that you have already uploaded a video.
'How to' with screen shots
- Create a transcript. The transcript should match the audio exactly. Save the file as a .txt file without any formatting. The text file should include not only spoken words but also any other sounds, like “background music” or “doorbell.”
- While logged into YouTube at the top right from the user account icon select YouTube Studio from the dropdown menu , or select the large blue YOUTUBE STUDIO button.
- Next, on the left side of the screen hover over the menu and select the Videos icon
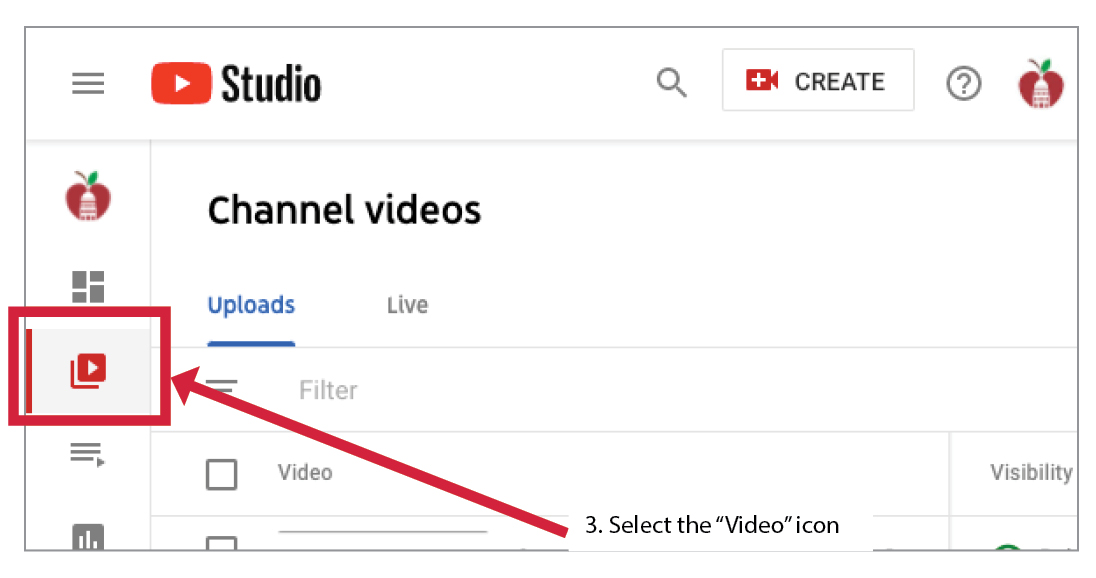
- This takes you to a list of all of your "Uploaded" or "Live" videos.
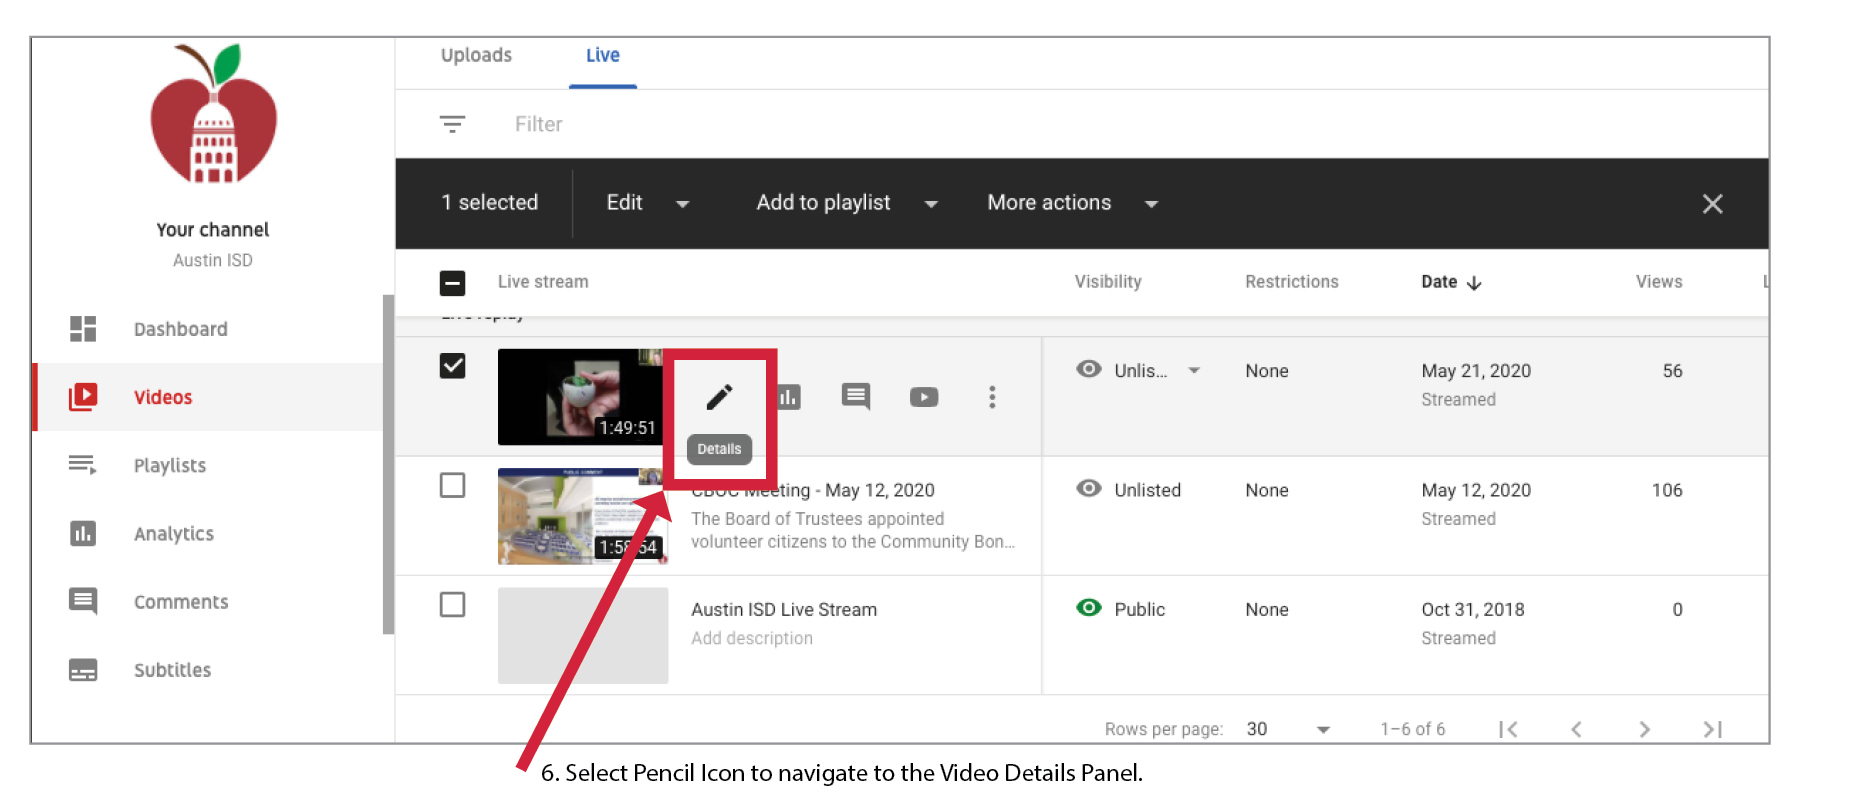
- Selecting the checkbox by the video preview to choose the video to which you’d like to add captions.

- Hover over the preview and select pencil icon to open the Video Details Panel
- Select the More options tab at the top of the page
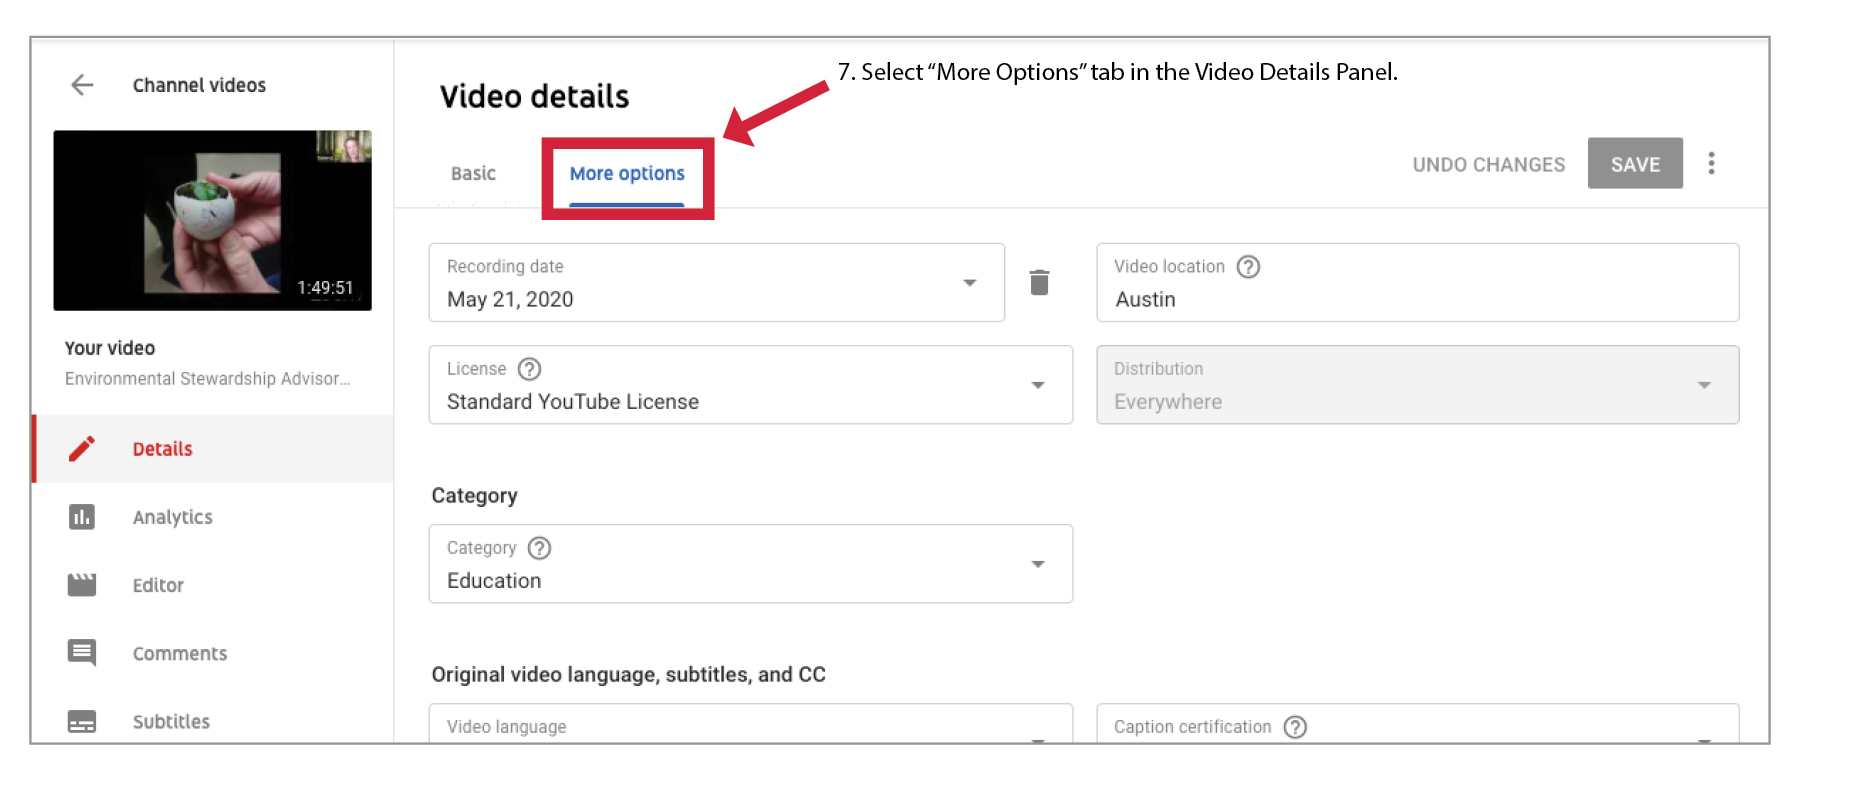
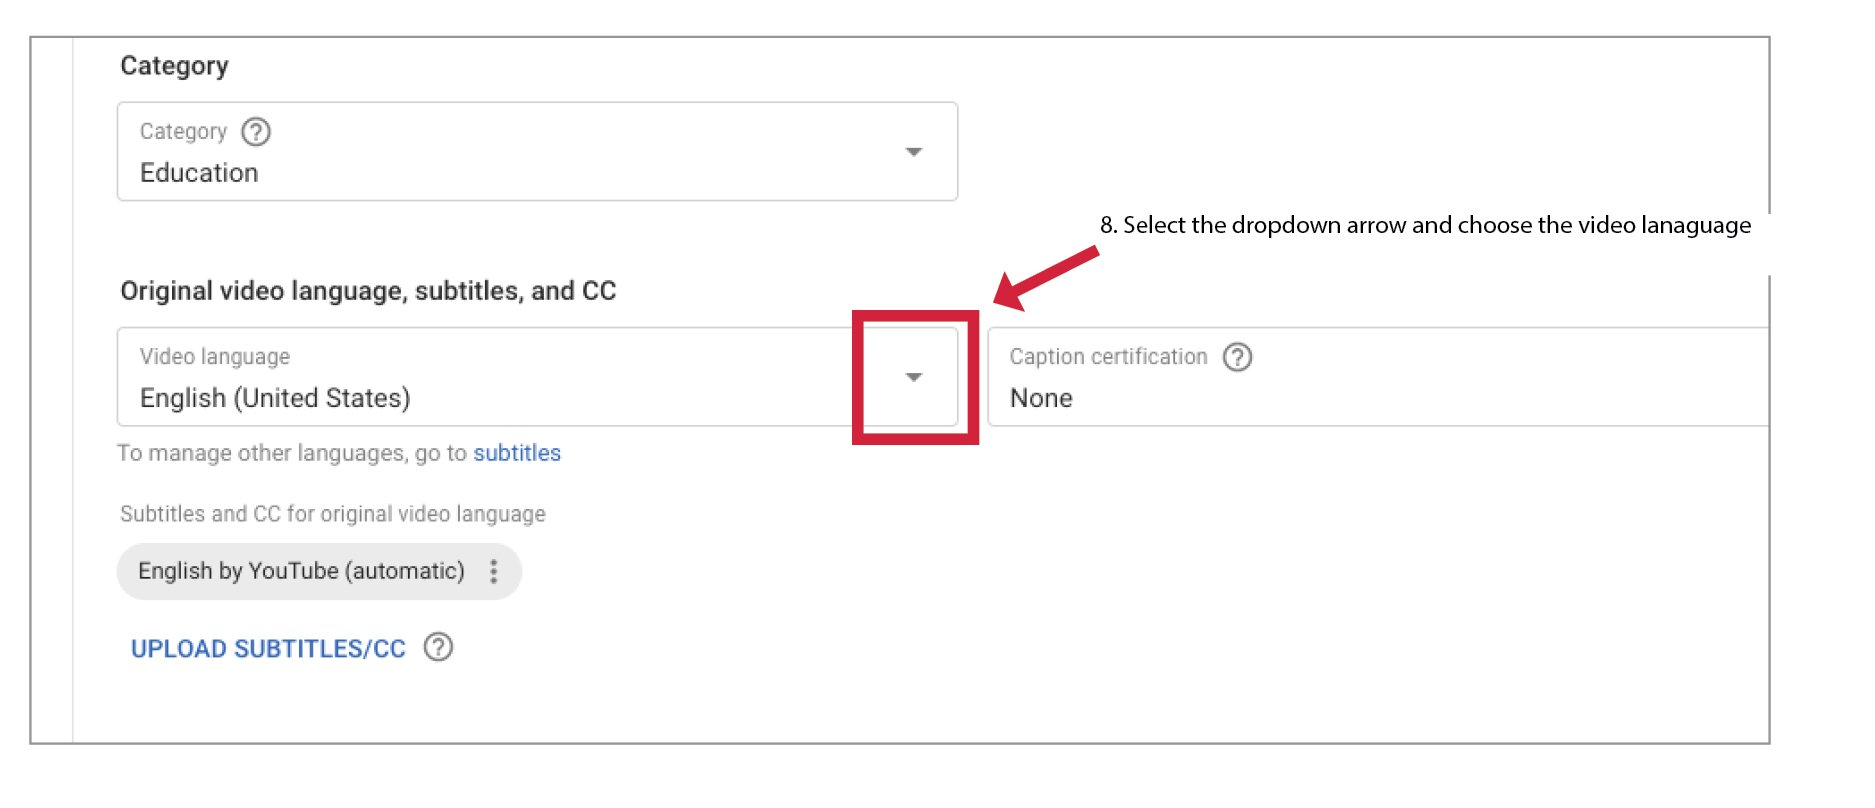
- Scroll down to the "Original video language, subtitles, and CC" heading and select from the dropdown menu the video language.
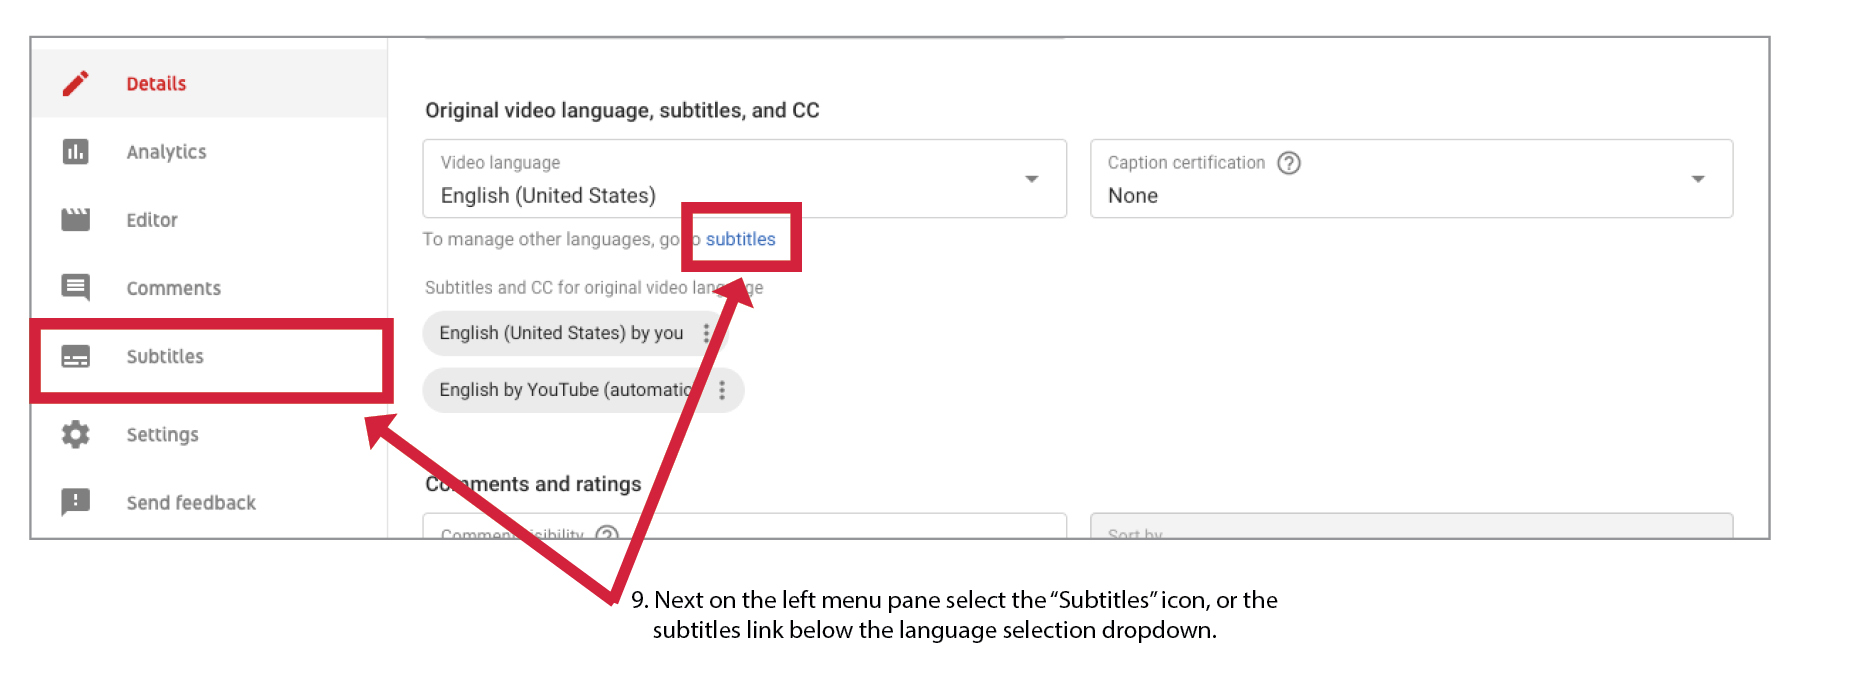
-
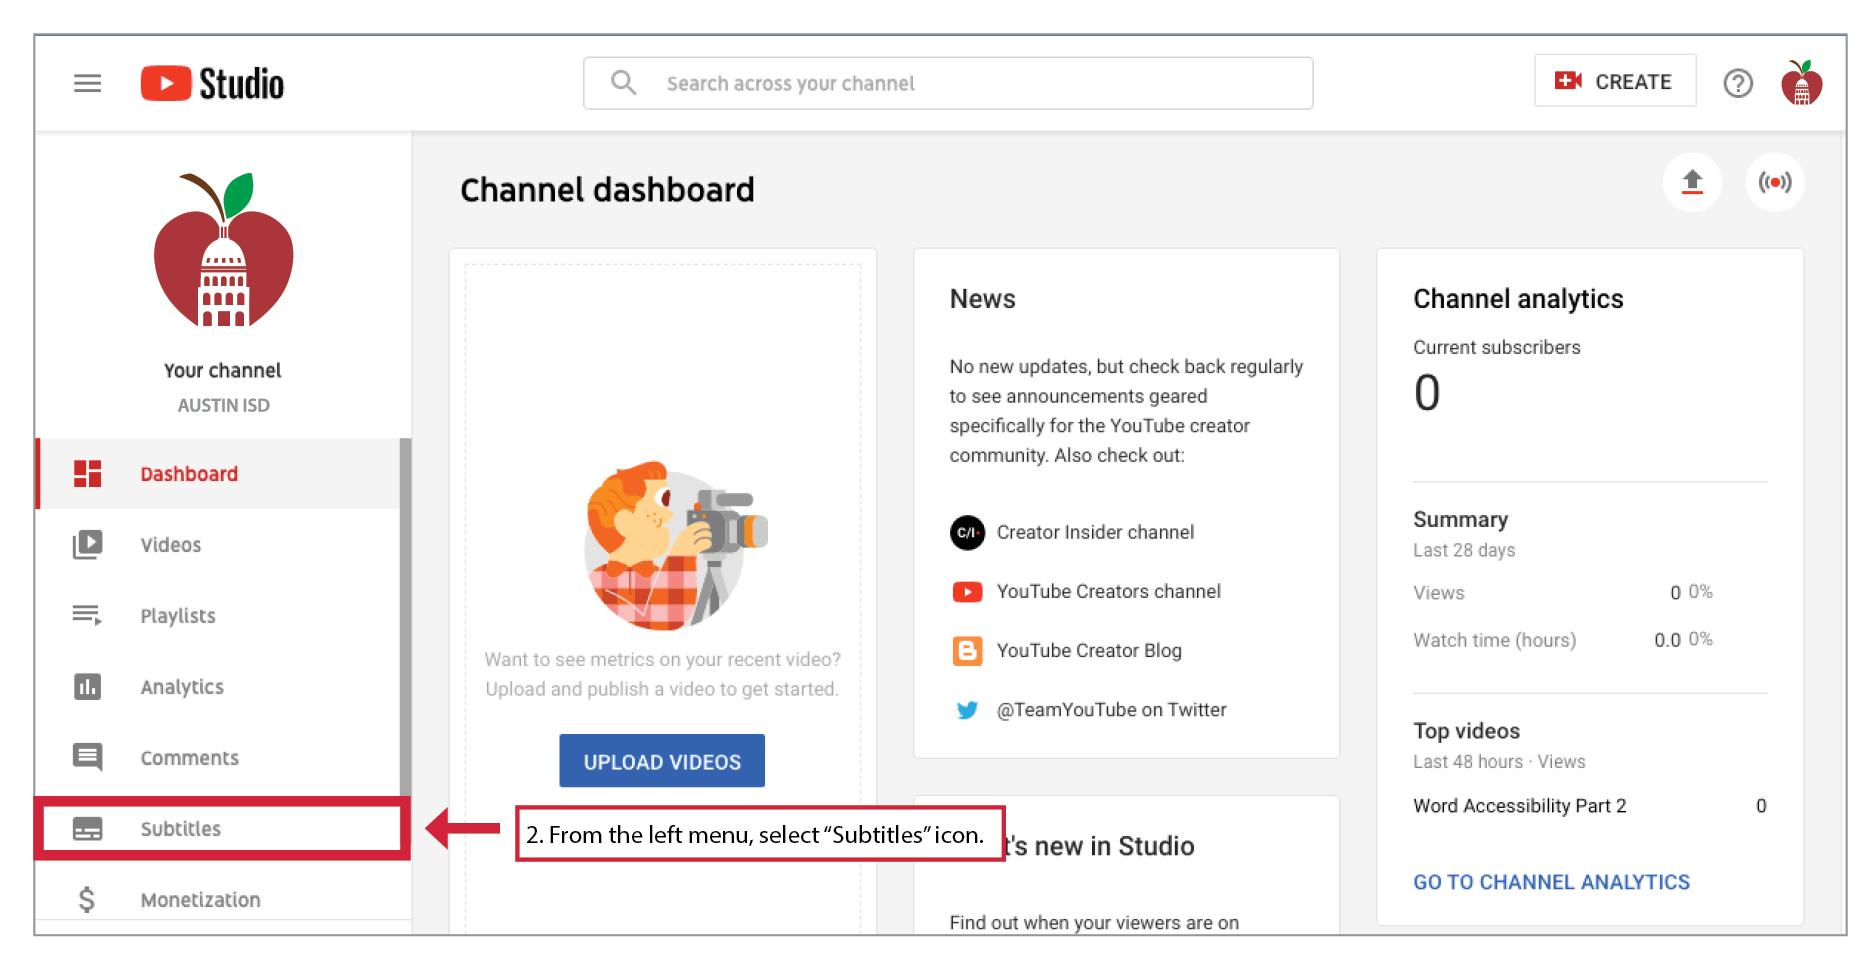
Next on the left menu select the Subtitles icon, or the subtitles link below the language selection dropdown.
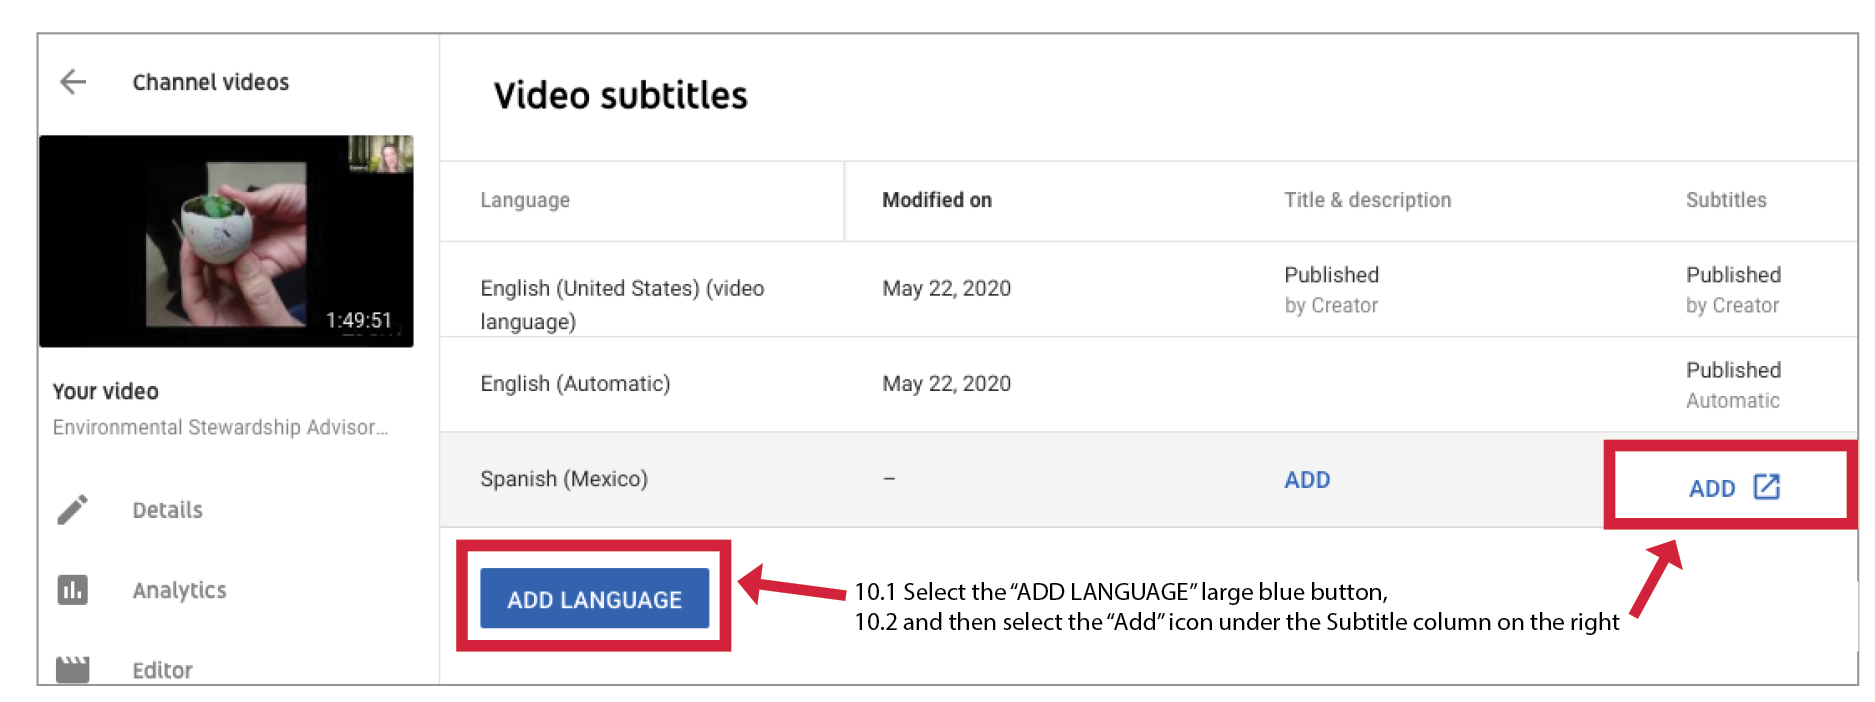
- Select the ADD LANGUAGE large blue button, and then select the ADD icon under the Subtitle column on the right.
- Now it's time to add your transcript. Select the Upload a file button.
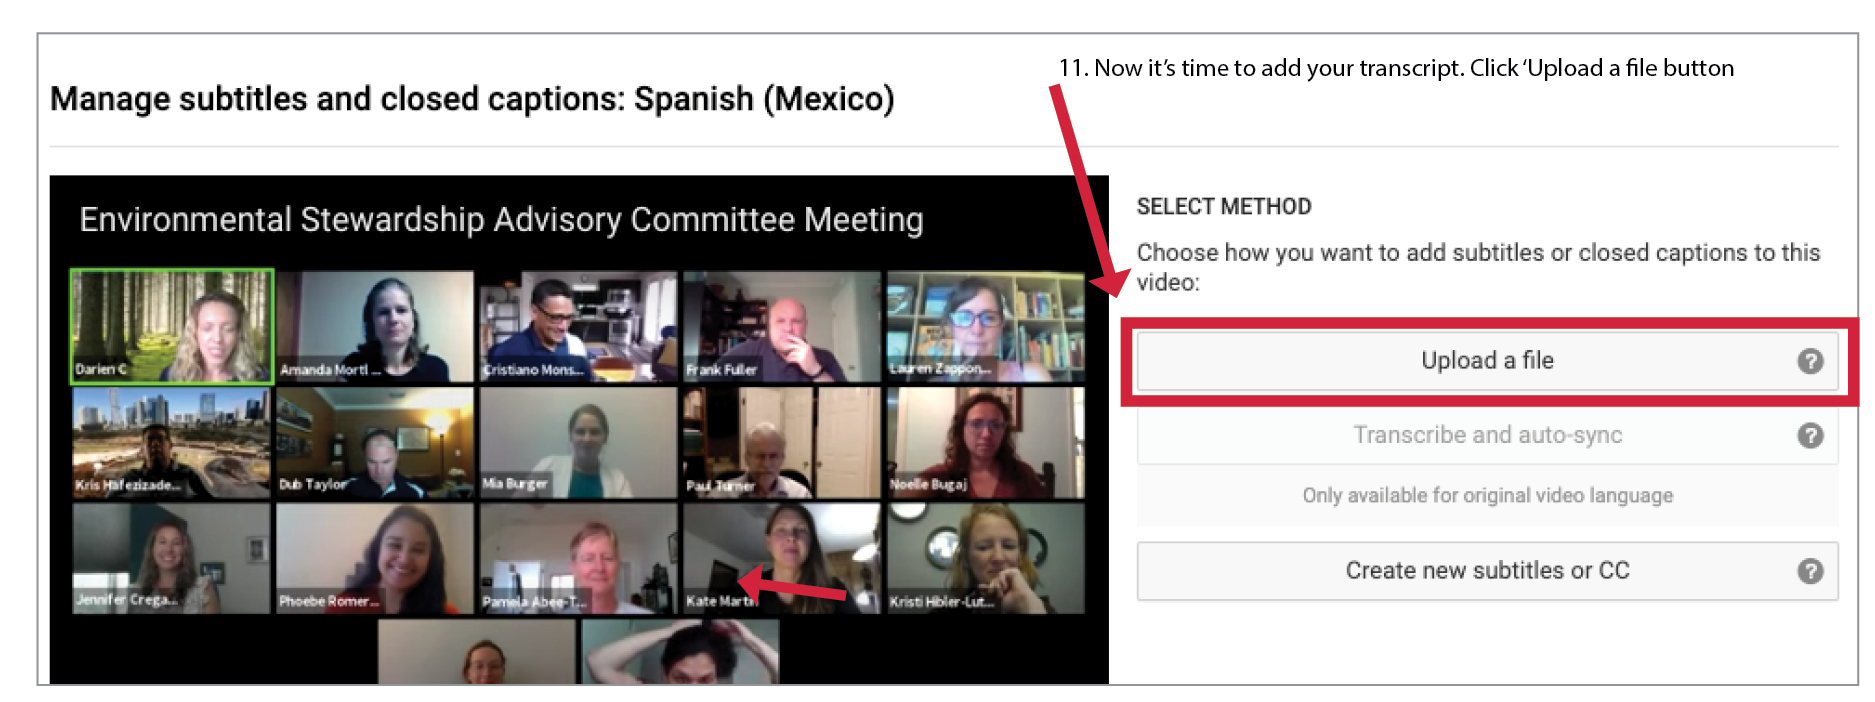
- Select the Choose File button and browse to the transcript file (.txt file) on your computer. Then select the blue Upload button at the bottom right.

- YouTube will automatically sync the words in your transcript to the timings of the audio. This process may take some time, depending on the length of the video. When YouTube is finished setting the timing, review the captions to make sure the words synced properly with the audio track by selecting the captions under the My Drafts heading.

- On the "View published subtitles and CC (Automatic)" you can crosscheck timing and the transcript by selecting the Edit button towards the right corner.
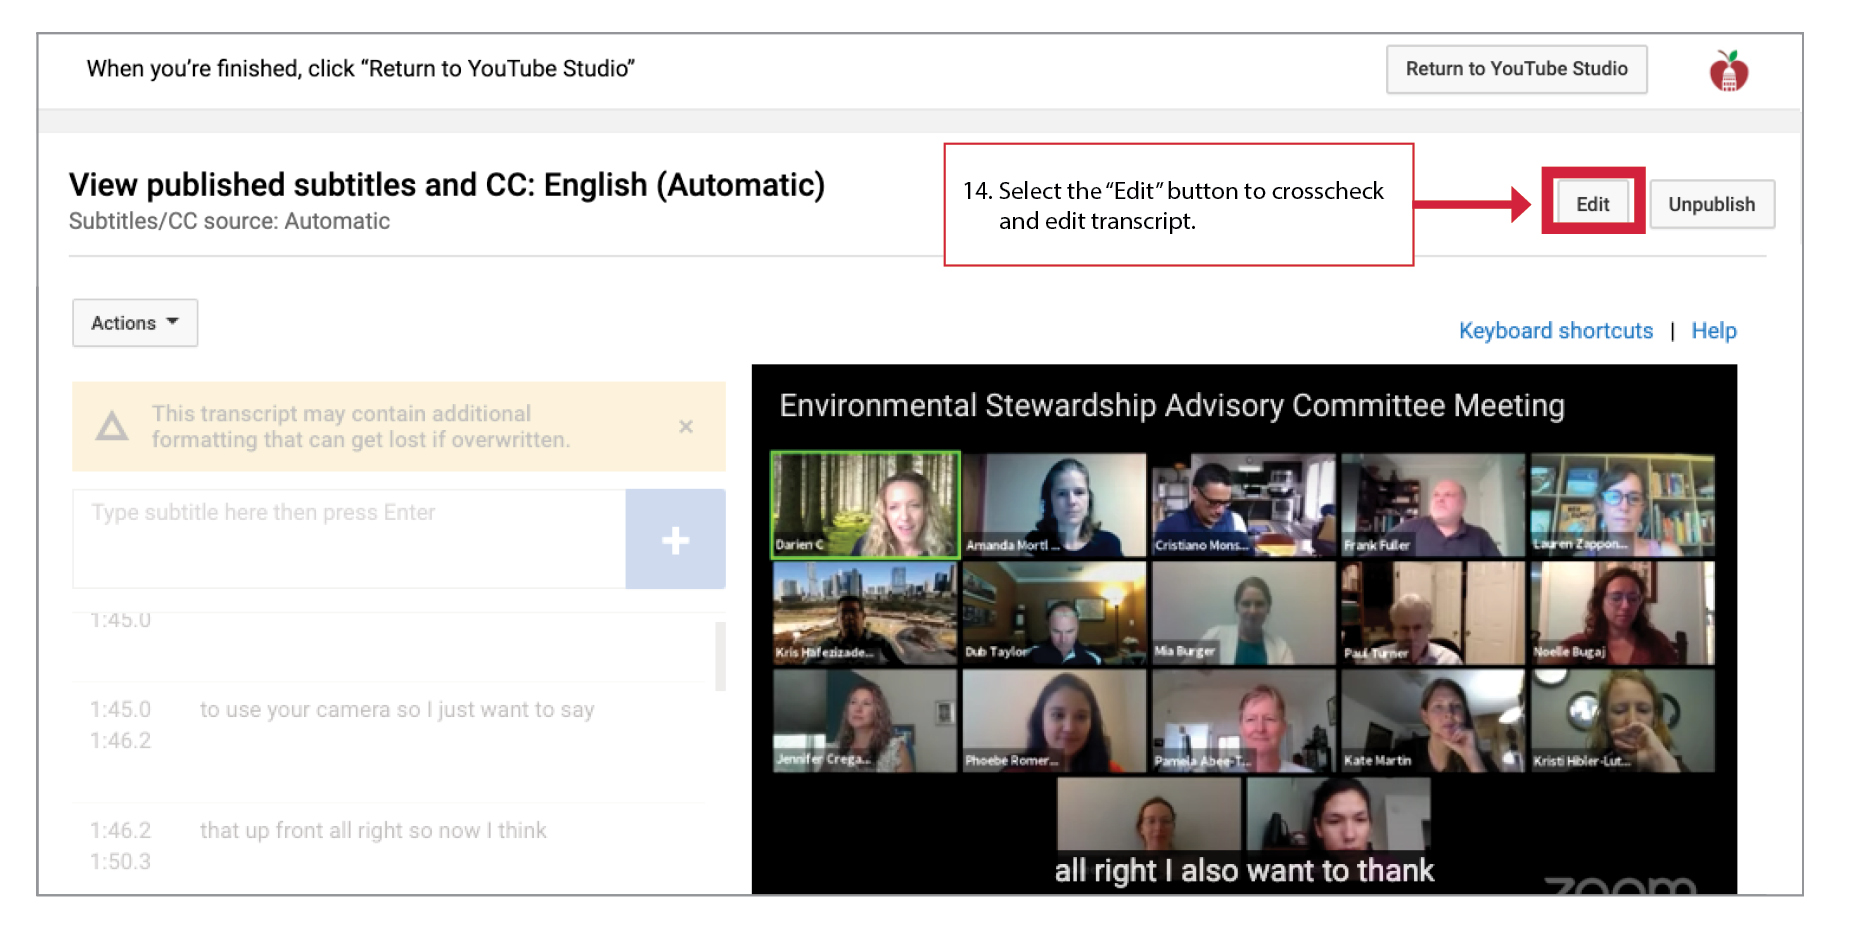
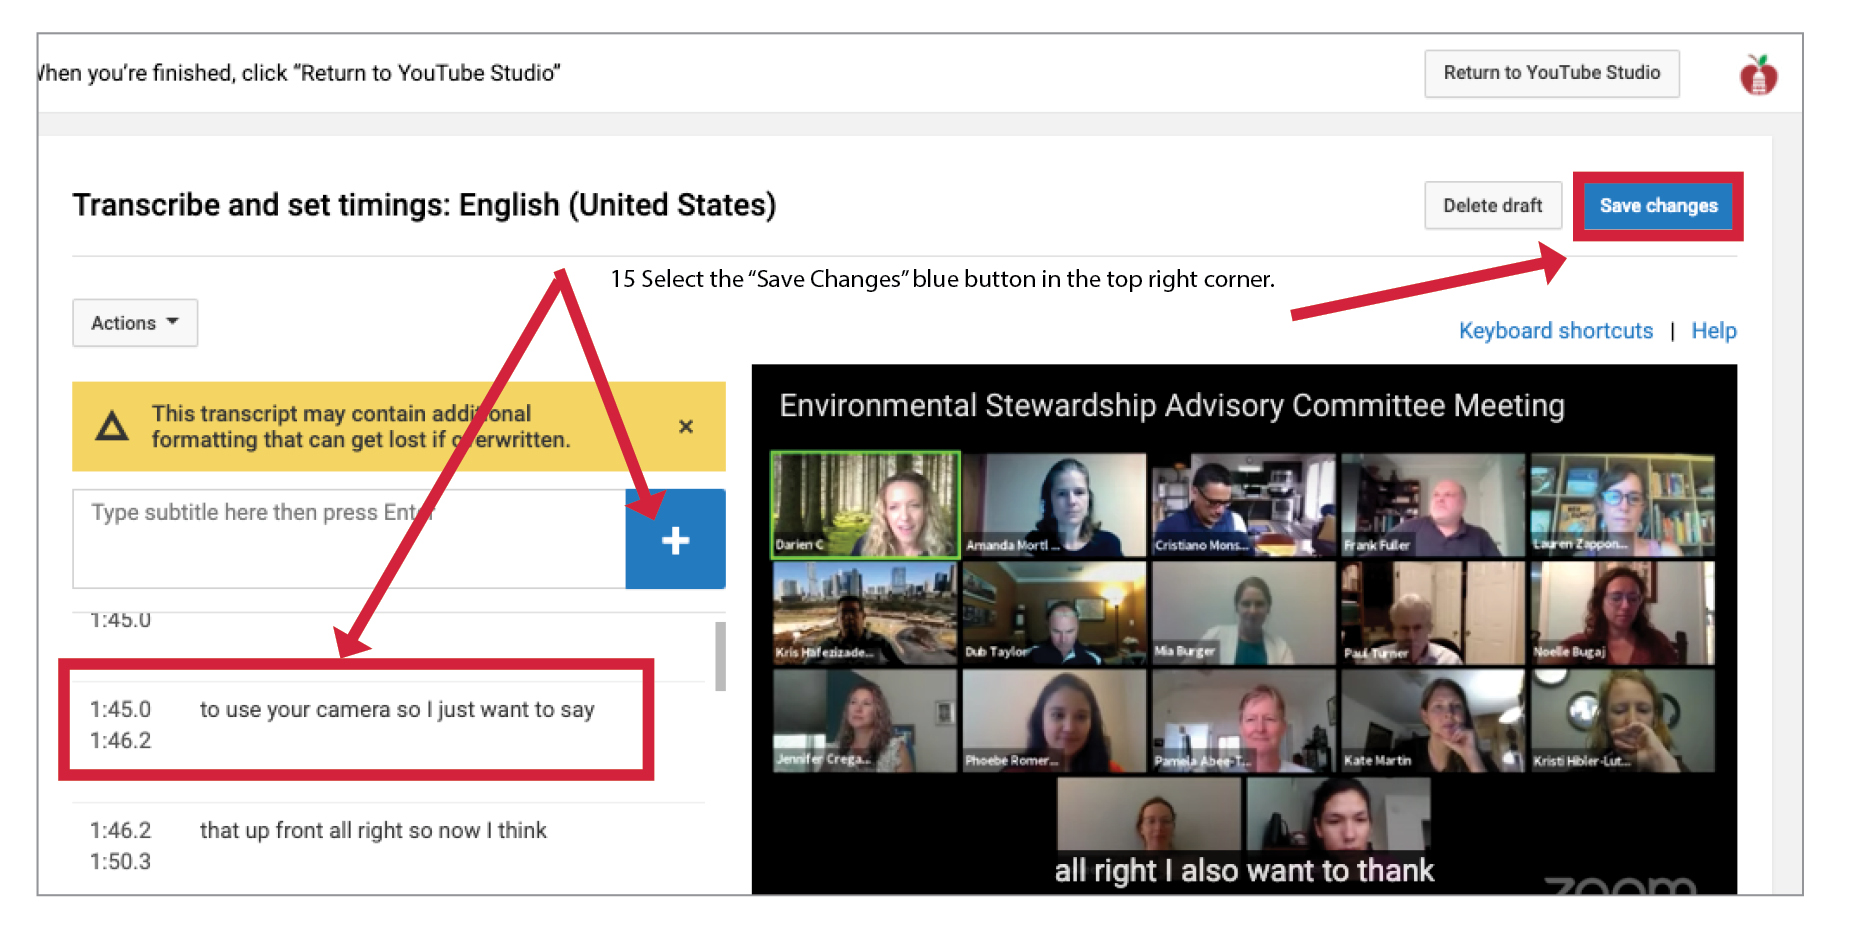
- Watch and listen to your video to verify that the timing is accurate. Edit the text and the timing if you find errors by typing into the captioning fields section, using the plus icon, and scrolling over the video player timing section. Select the Save changes button at the top right to make captions publicly available.
Video Example: How to Upload a Video
Video Example: Navigating YouTube Studio
Video Example: Automatic timing in captions
YouTube Documentation: Add your own subtitles & closed captions
Method 3: How to use automatic captioning and correct inaccurate voice recognition errors in YouTube
If you don’t have a transcript, you can use YouTube's automatic captioning tools along with correcting errors to produce accessible captions. However the simplest method is to upload a transcript file. If the video is longer than five-minutes we suggest sending it to a professional captioning service like REV.
Automatic captions are available in English, Dutch, French, German, Italian, Japanese, Korean, Portuguese, Russian, and Spanish.
YouTube is constantly improving its speech recognition technology. But automatic captions might misrepresent the spoken content due to mispronunciations, accents, dialects, or background noise. Always review automatic captions and edit any parts that haven't been properly transcribed.
'How to' with screen shots
- While logged into YouTube at the top right from the user account icon select YouTube Studio from the dropdown menu, or select the large blue YOUTUBE STUDIO button.
- Next on the left menu select the Subtitles icon.
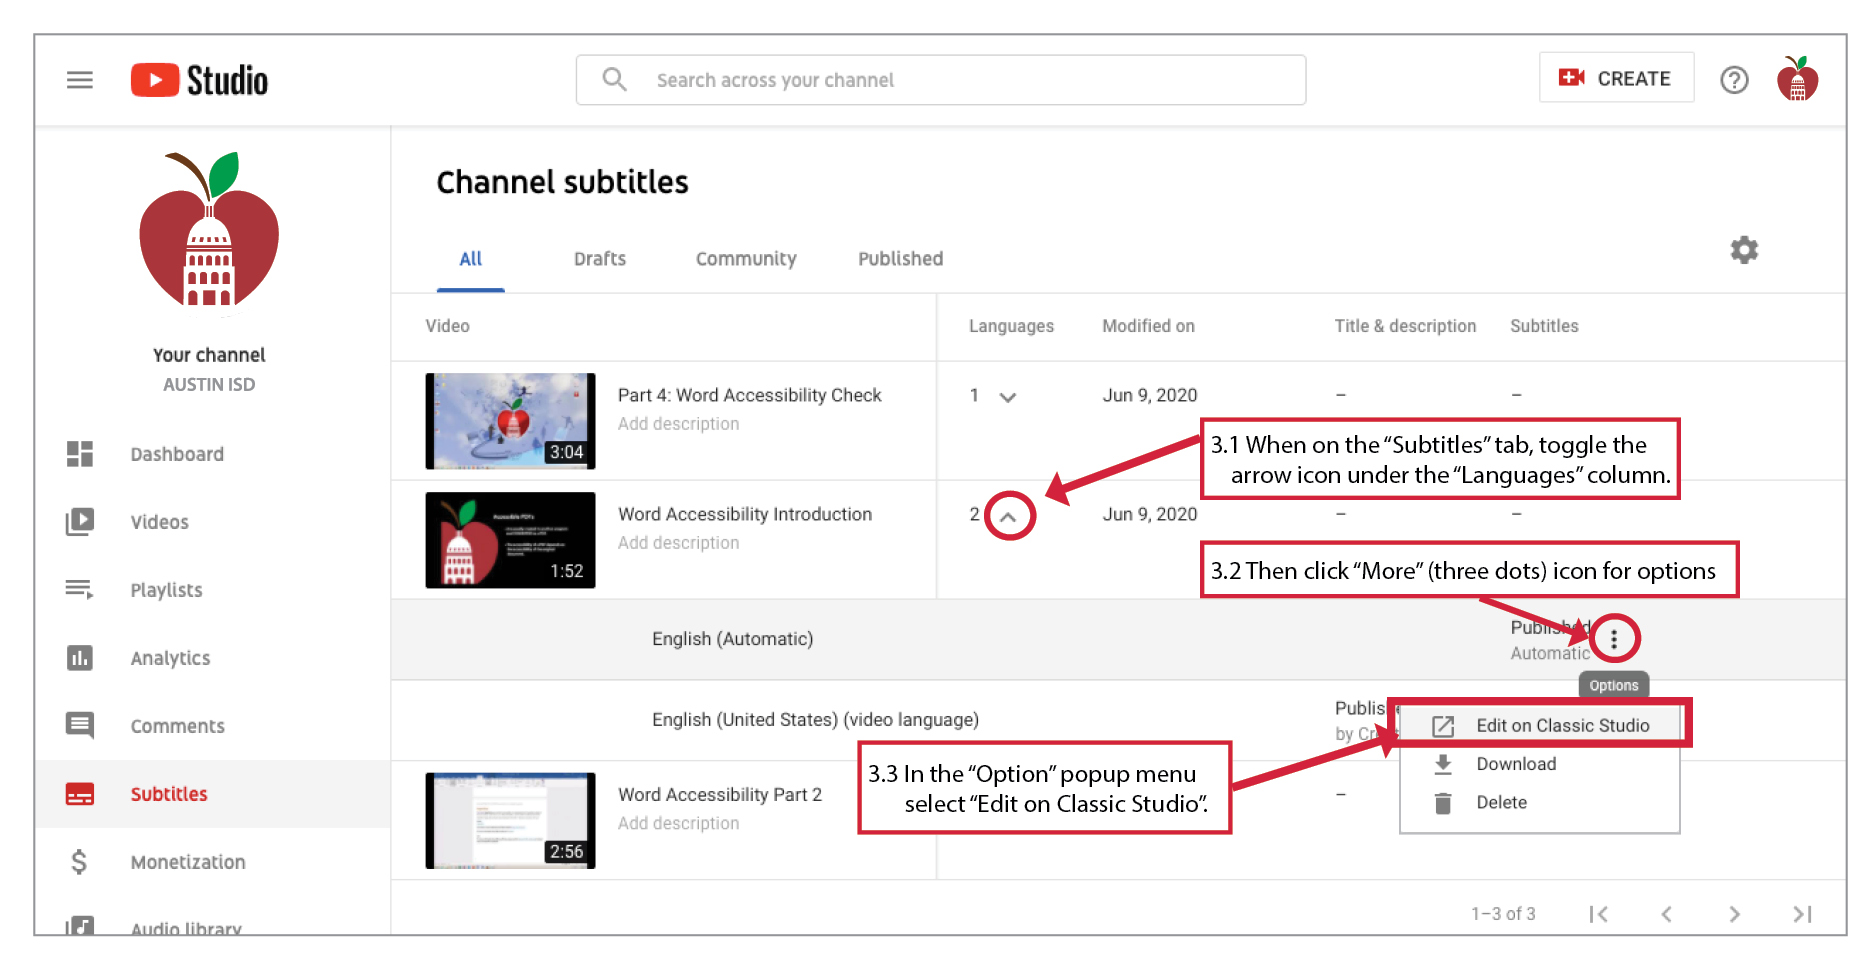
- Determine the video you want to add captions or subtitles.
When on the “Subtitles” tab, toggle the arrow under the “Languages” column. Then click More (three vertical elipses icon) next to the subtitles you want to edit. In the “More” popup menu select Edit on Classic Studio.
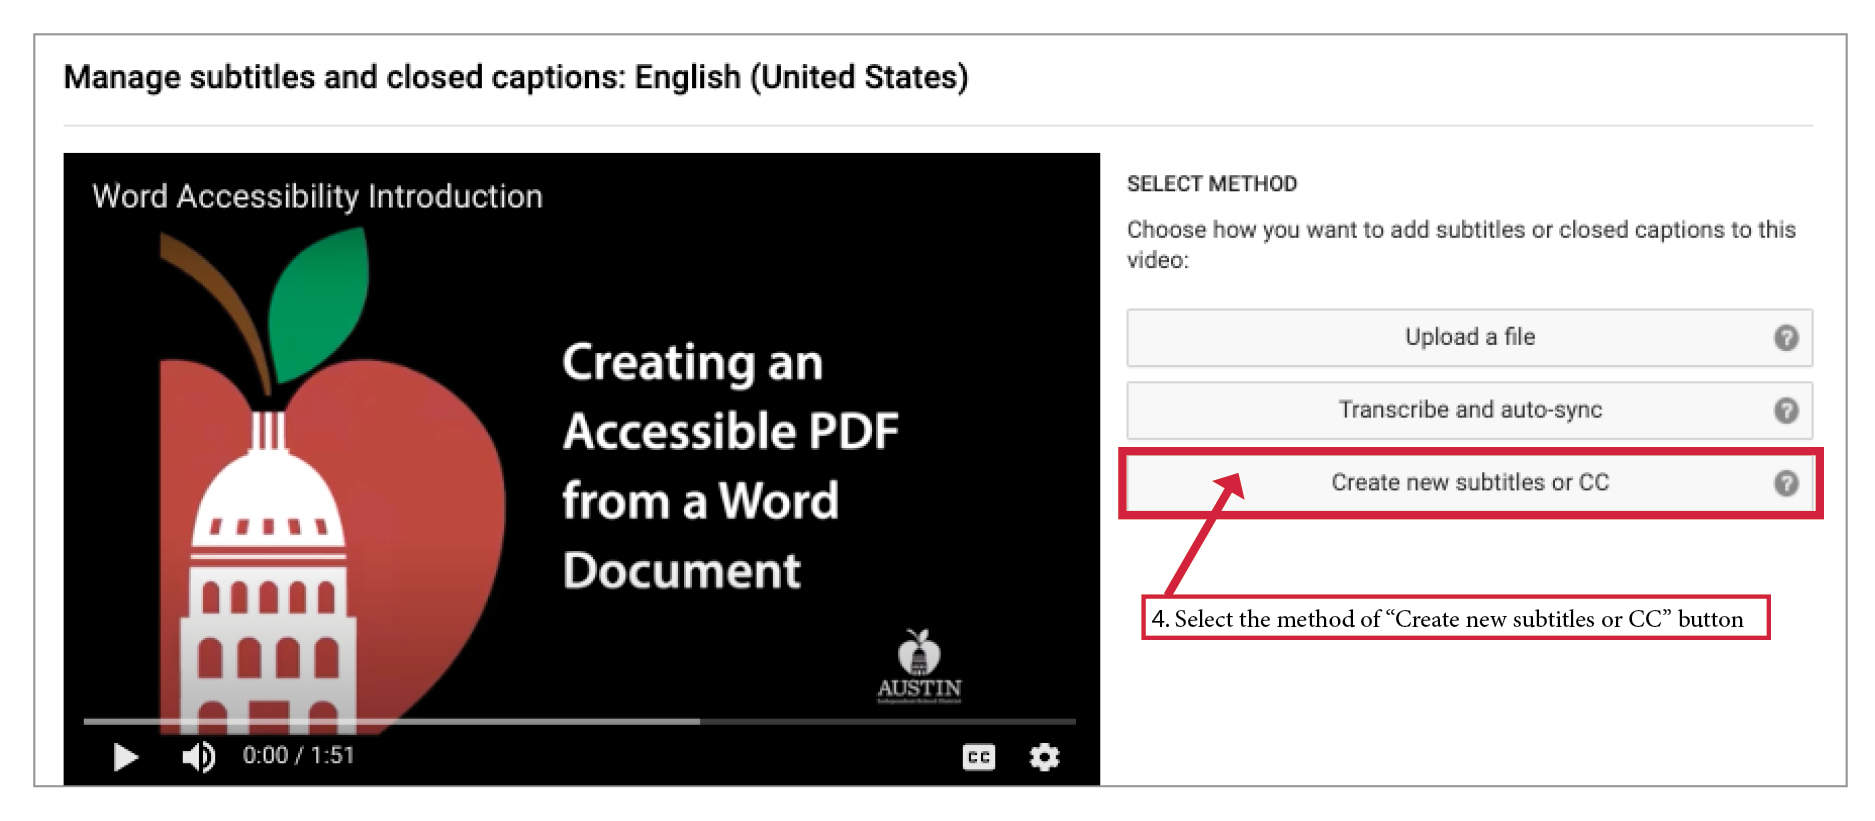
- On the "Manage subtitles and closed captions" page select the method of Create new subtitles or CC button. This may take some time depending on the length of your video.
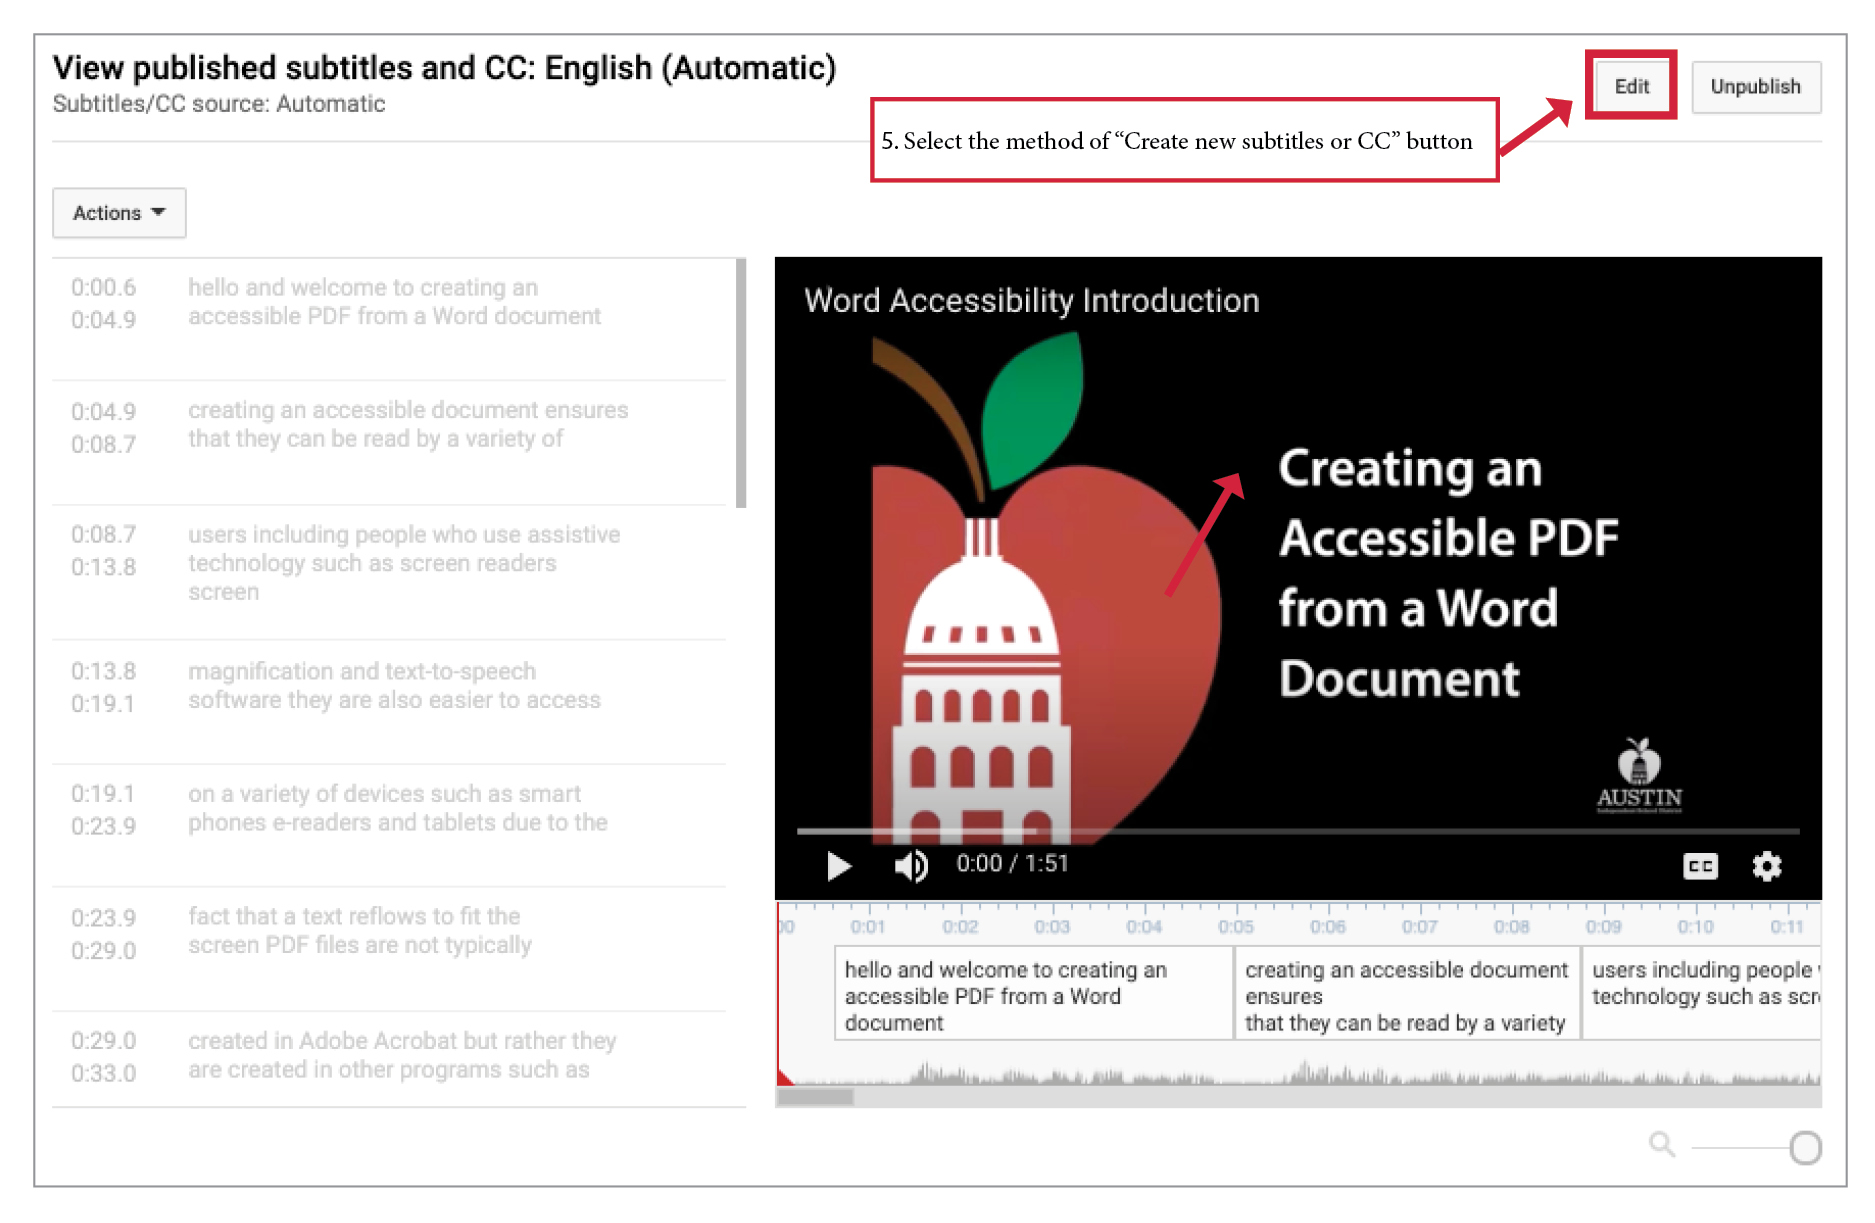
- Select the Edit button to review and correct the automatic captions.
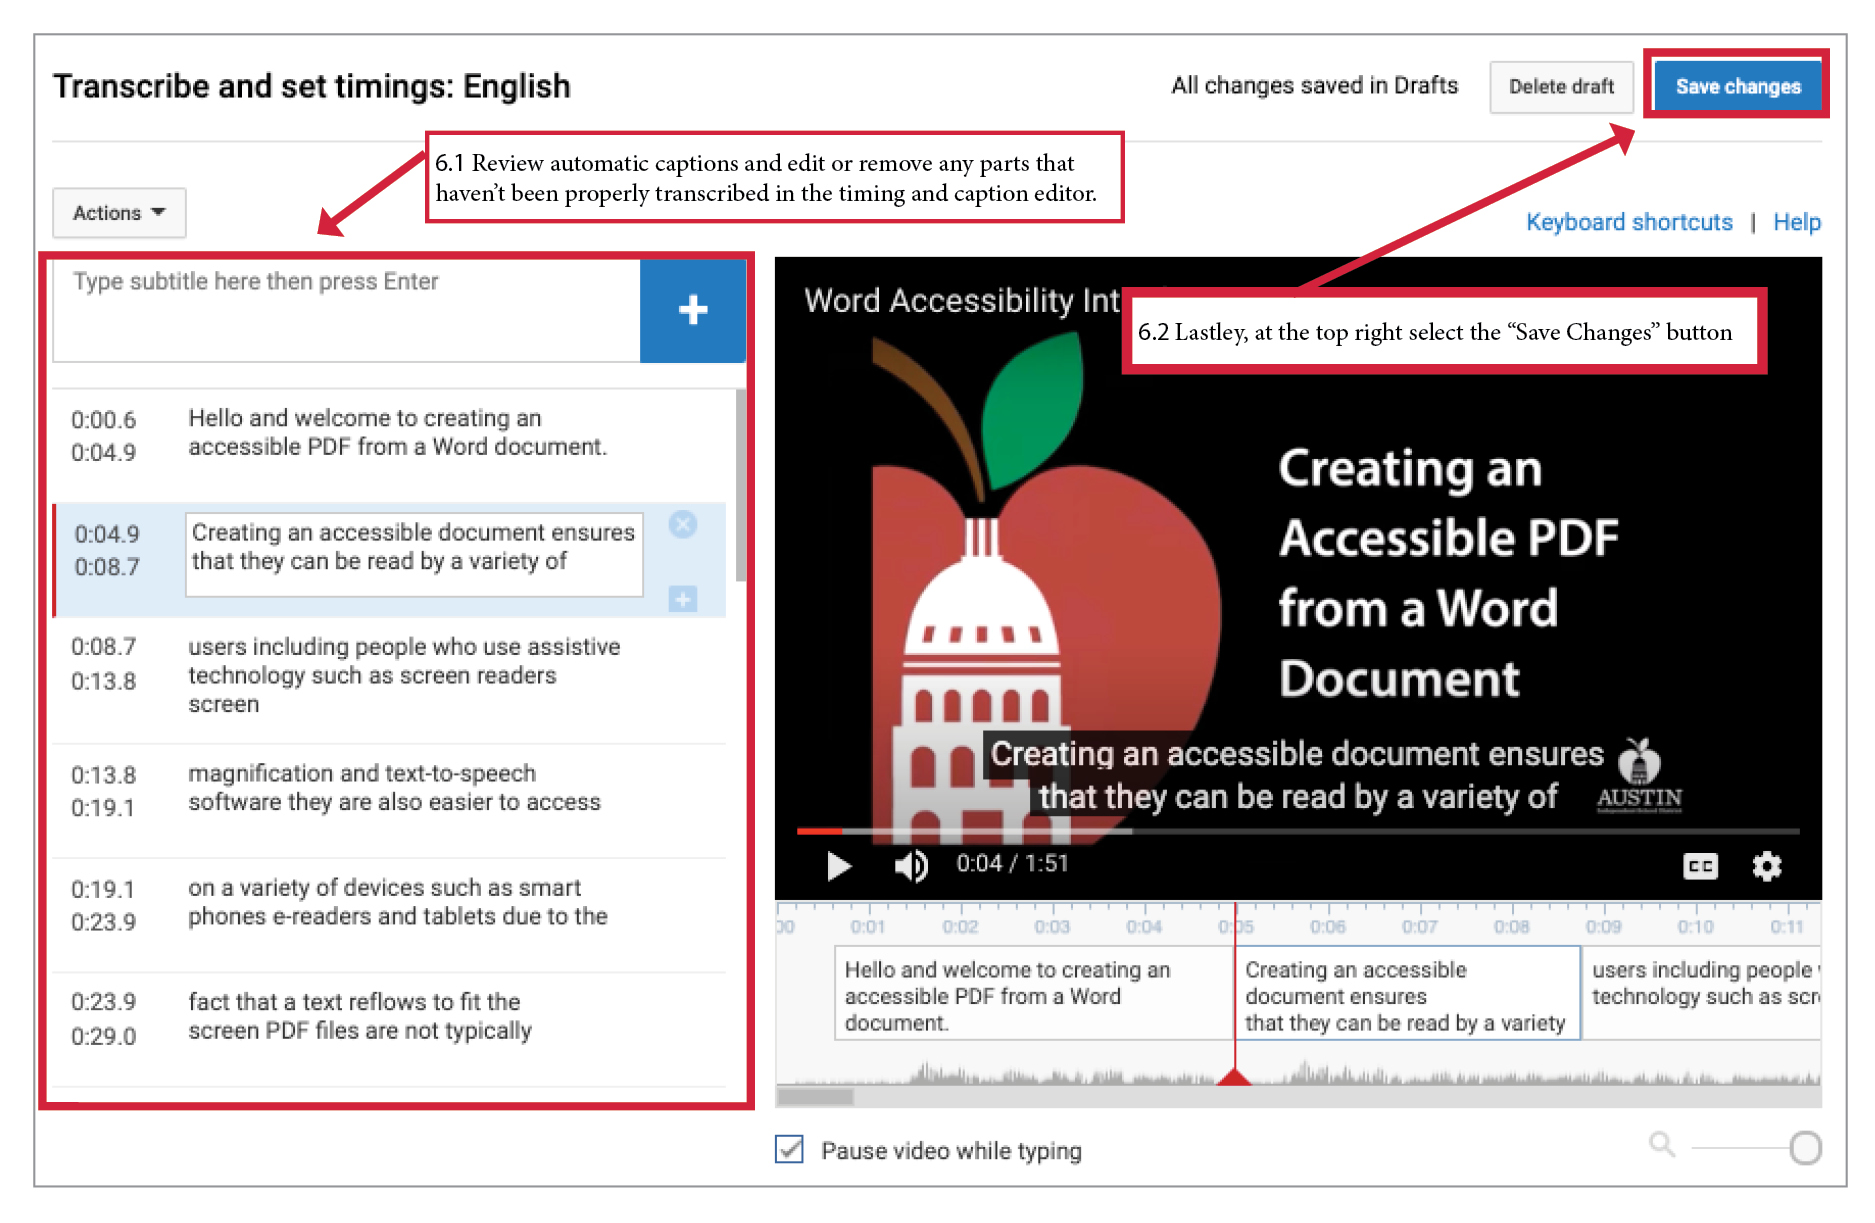
- Review automatic captions and edit or remove any parts that haven’t been properly transcribed in the timing and caption editor. Watch and listen to your video to verify that the timing is accurate. Edit the text and the timing if you find errors by typing into the captioning fields section, using the plus icon, and scrolling over the video player timing section. Select the Save changes button at the top right to make captions publicly available.
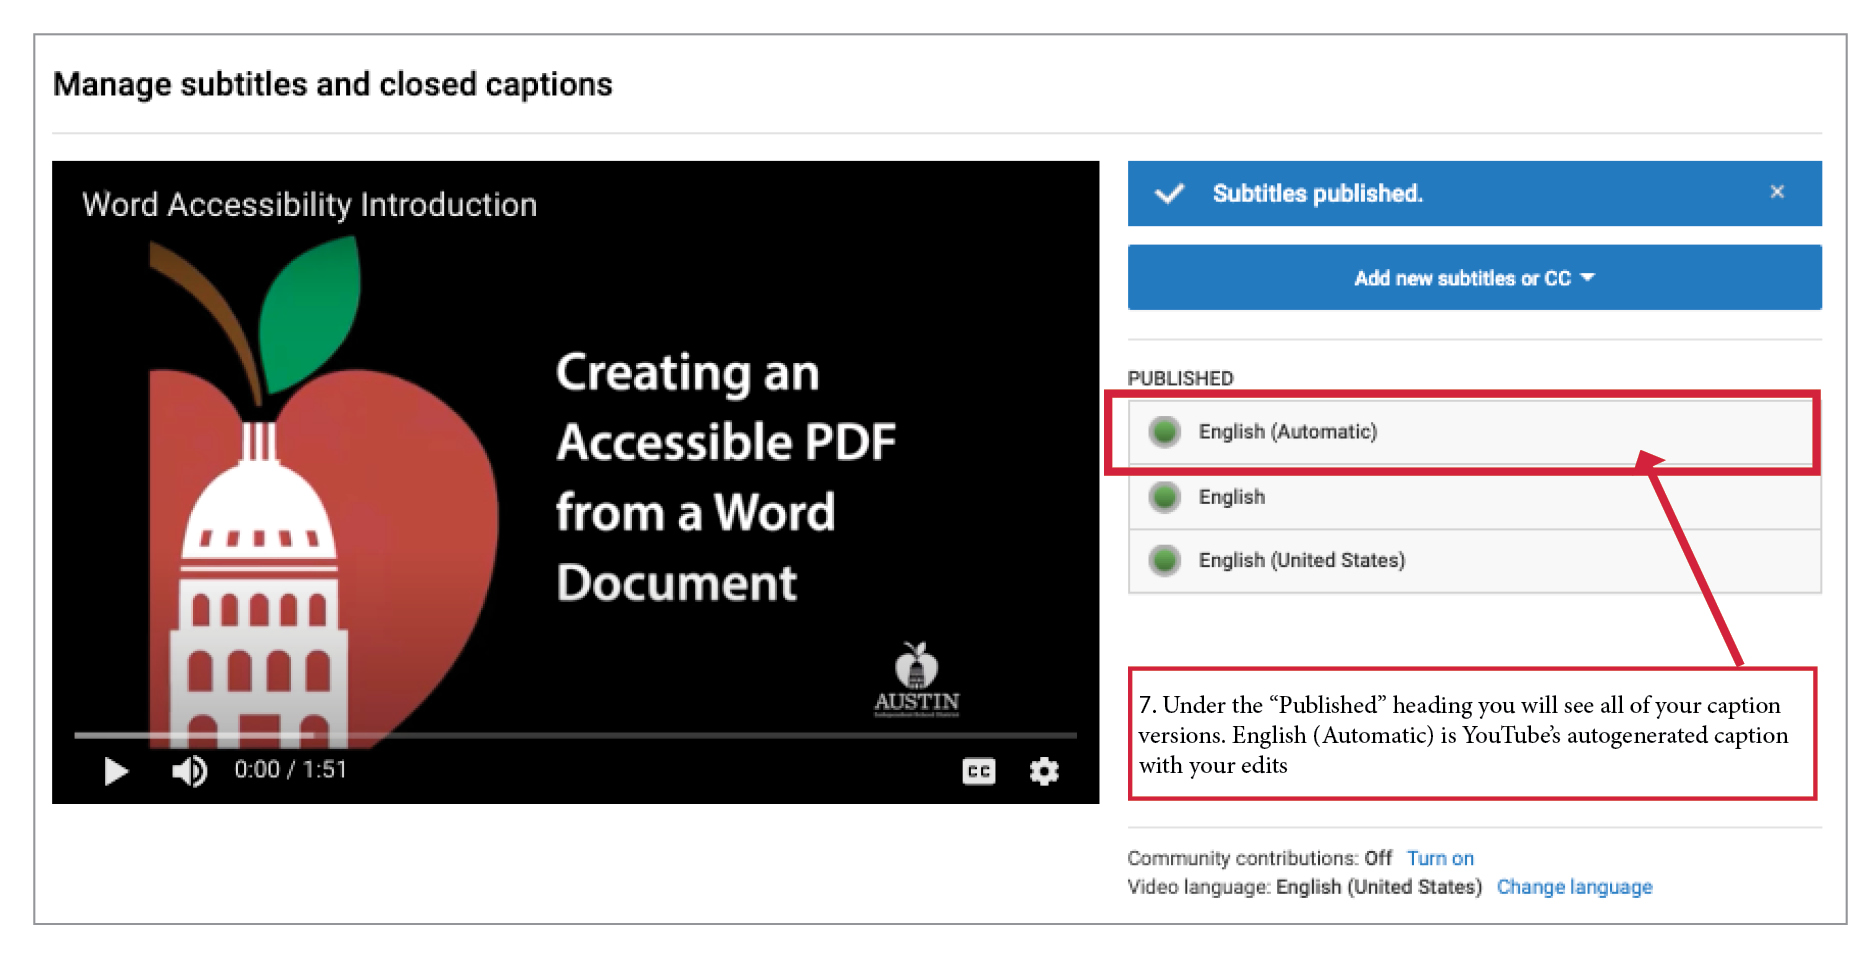
- Under the “Published” heading you will see all of your caption versions. English (Automatic) is YouTube’s autogenerated caption with your edits.
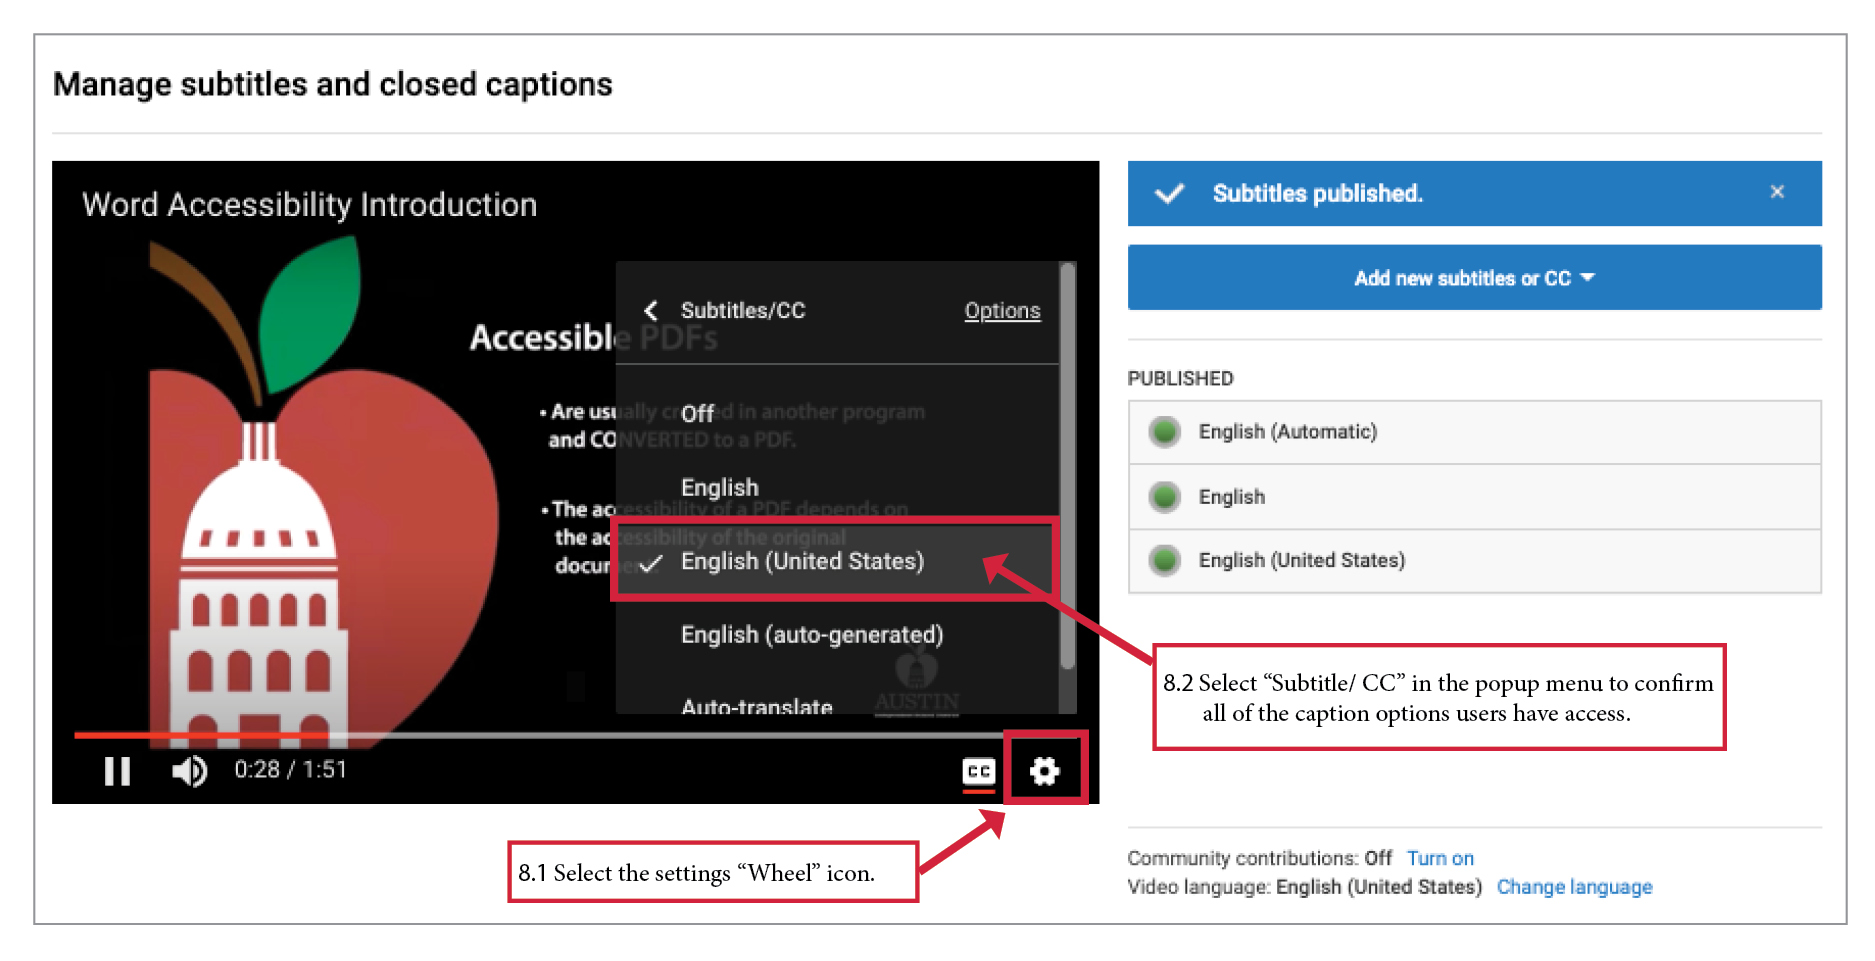
- Select the settings Wheel/ Cog icon on the video player. Select Subtitle/ CC in the popup menu to confirm all of the caption options users have access. This should mimic the “Published” heading captions titles.
Video Example: How to Upload a Video
Video Example: Navigating YouTube Studio
Video Example: Automatic timing in captions
YouTube Documentation: Add your own subtitles & closed captions
Managing Subtitles & Multiple Languages in YouTube
YouTube supports multiple languages for closed captioning. Note that the original video language allows for a transcript upload, but not for other languages. Supported subtitle and closed caption files must be uploaded as an SubRip Subtitle (SRT) file. This file type contains video subtitle information like the start and end timecodes of the text and the sequential number of subtitles.
Though you can set many more languages the automatic captions are available in English, Dutch, French, German, Italian, Japanese, Korean, Portuguese, Russian, and Spanish. This means you will need to provide an SRT file, or manually type, or copy and paste (from a transcript locally to YouTube) within the captioning editor. With the ten languages that provide automatic captions you may use those as a starting point and publish after correcting them.
For translation and captioning accuracy we recommend using one of the service providers above that can generate translations, or SRT files. You may also consider recommendations from the Department of Communications & Community Engagement.
Video Example: How To Create SRT Files - How to Upload SRT Files to Social Media
YouTube Documentation: Add your own subtitles & closed captions
Working with Transcripts for Audio Only Files
When posting a podcast or audio only files you must include a transcript. It's best to put the transcript on the same page as the audio file for ease of use and content relationship.
Where to put the transcript
- Place the text of the transcript directly on the page.
- Link to the transcript near by the audio player, or right under the audio/ video for download.
- When audio is hosted elsewhere, then it may be on a separate webpage.
What to Check for Once Your Multimedia is Complete
- WAI Testing and Evaluation Tools (media)
- Chrome Lighthouse (web developer)
- WAVE Web Accessibility Evaluation Tool (website)